Reducing document size for online submission
- Gerard Ross
Introduction
The maximum file size that can be submitted to Turnitin is 40 megabytes. If you have created a large office document that includes images and diagrams, it may be necessary to reduce the documents file size so that it is under this limit. The added benefit of smaller file size is that the document will be faster to upload.
Images contained in Office documents are often in a higher resolution than necessary for viewing on screen. High-resolution images will have a corresponding large file size that affects a document's overall file size. The file size of these images can be reduced without significant loss in image quality.
This document describes how to check the file size of your document before submission and details some methods to reduce and optimise images if the document exceeds 40 megabytes.
Note: Make a copy of your original file BEFORE attempting any of the steps shown. Work ONLY with the copy.
Table of contents
How to check file size
How you check an Office document’s file size depends on what operating system you’re using i.e. Windows or Mac OS.
Note: File size is shown in either KB (Kilobytes) or MB (Megabytes). Remember that 1024 KB is equal to 1 MB.
Check file size in Windows
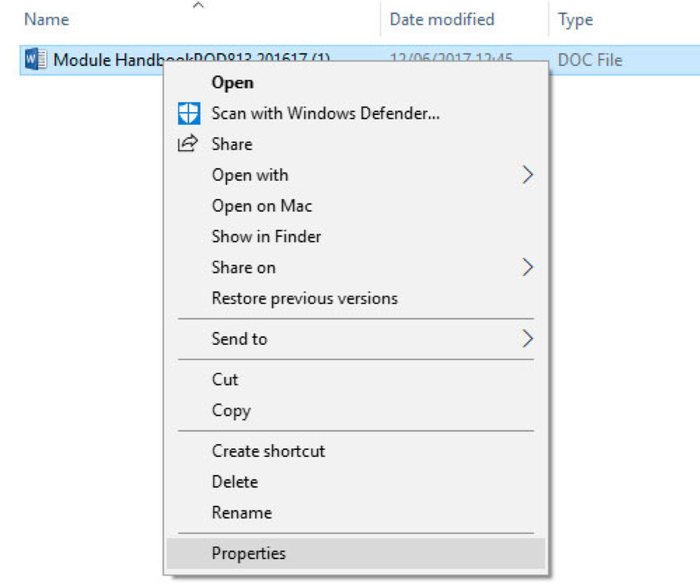
To check file size in Windows:
- Navigate to your assignment file using the File Explorer.
- Select the document. Right-click on the file to see the shortcut menu.
- Select the Properties option.
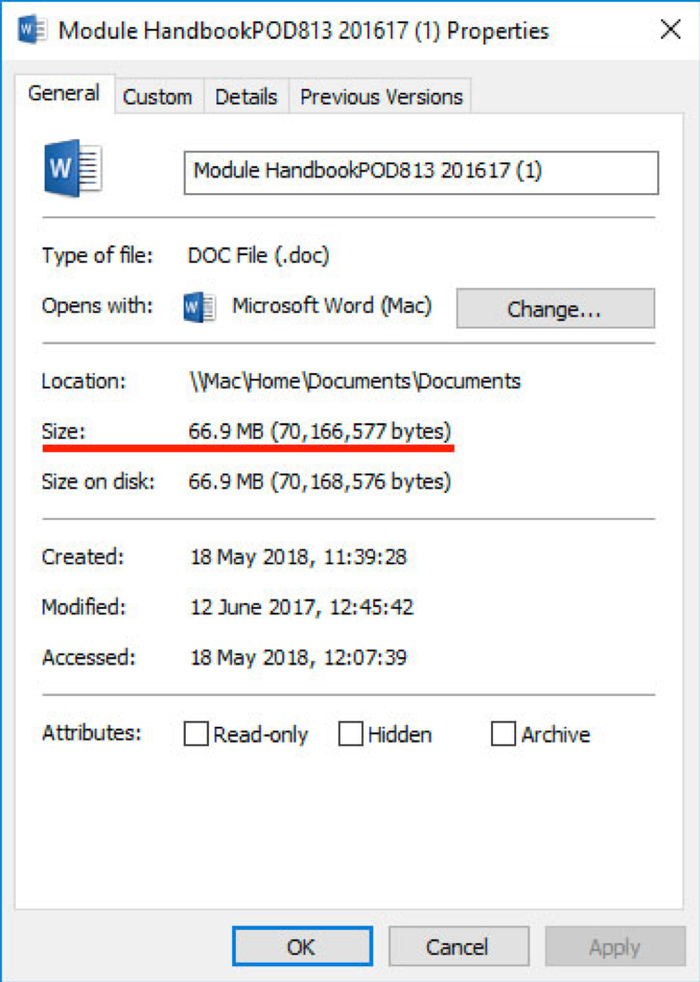
- In the Properties window that opens, look for Size (highlighted in red below). This shows the size of the document. In the example below, it is 66.9MB – too large to submit to Turnitin.
Check file size in Mac OS
To check file size in Mac OS:
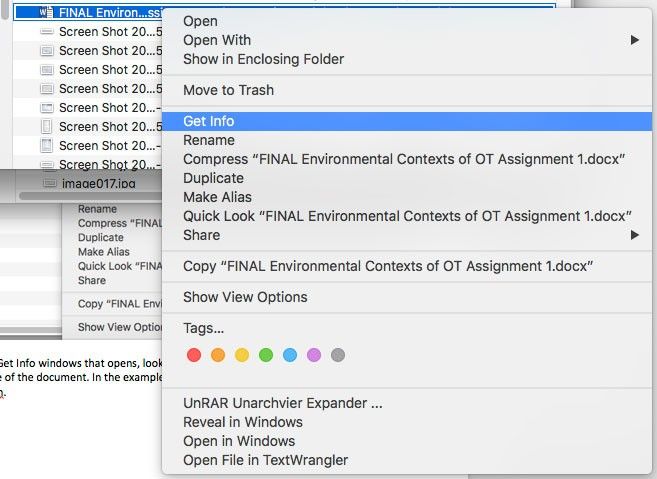
- Navigate to your assignment file using the Finder.
- Select the document. Hold down the CTRL key and left click (or right-click) on the document to see the shortcut menu.
- Select the Get Info option. Alternatively, select the document and press the CMD and I key to get info on the document.
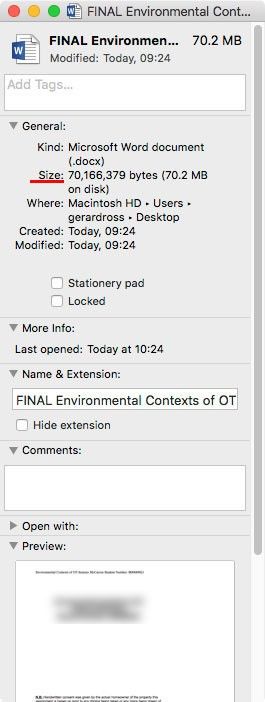
- In the Get Info windows that opens, look for Size (highlighted in red below). This shows the size of the document. In the example below, it is 70.2 MB – too large to submit to Turnitin.
Reduce the size of an Office file (Windows)
Microsoft Office comes with an option to reduce the size of all of the images in your document. Taking Word as an example:
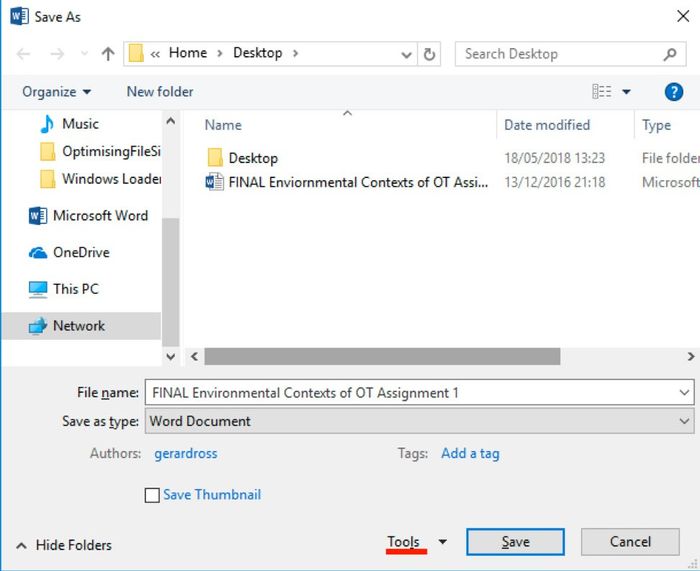
- With the document open in Word select File > Save As.
- Select More options…

- In the Save as dialogue box, select the Tools menu beside the Save button. This has been highlighted in red below.
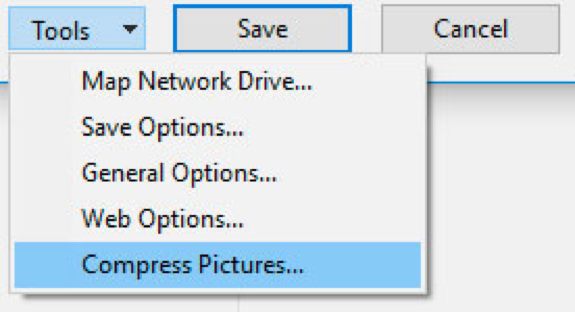
- From the Tools drop-down menu that appears, select the Compress Pictures… option.
In the Compress Pictures window, choose a lower Resolution.
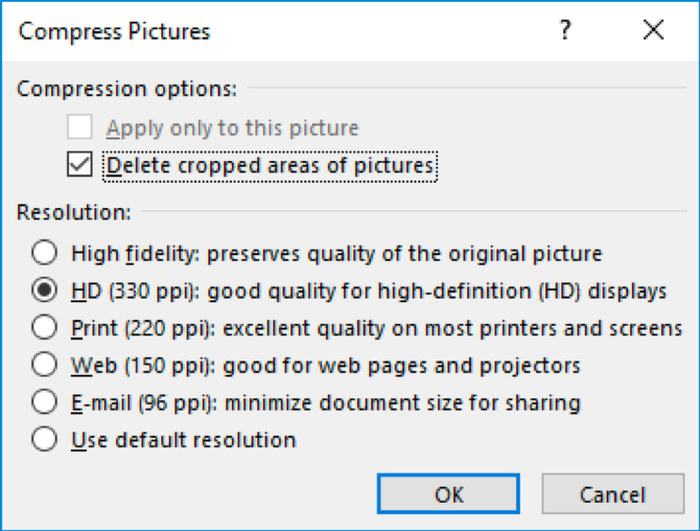
Select the OK button
Note: Image resolution guidlines:
HD (330pp) is the default resolution.
Print (220ppi) is suitable for on-screen viewing and printing.
Web (150ppi) is suitable for viewing on a computer and make a smaller file size. However, the images may not be suitable for printing.The above process can also be used to reduce the size of individual images and can be useful if some images need to be kept at a high resolution to show small details clearly.
Note: For the image optimisation process for older versions of Office, please see the following links:
Office 2013
https://support.office.com/en-nz/article/Reduce-the-file-size-of-a-picture-8db7211c-d958-457c-babd-194109eb9535
Office 2010
https://support.office.com/en-ca/article/Reduce-the-file-size-of-a-picture-9d8de420-3beb-4481-98e9-88efa4e2fd95
Office 2007
https://support.office.com/en-NZ/Article/Reduce-the-file-size-of-a-picture-5ad8ca3d-f251-4d96-a9ae-3e7ee374c91e
Reducing file size using Save as PDF
Using the Save as PDF feature in Word you have the option to reduce the size of a document - if it contains images.
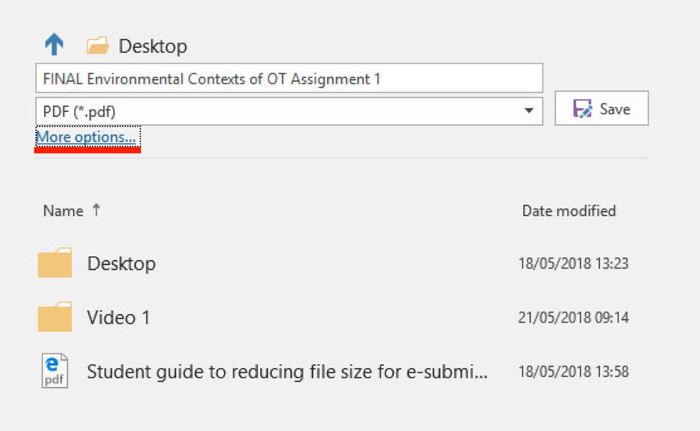
- Select File > Save As.
- In the Save as dialogue box, under Save as type, select PDF from the drop-down menu.

- If you cannot see the Optimize settings, select the More options link (highlighted in red below) to see them:
- Under Optimize for:, there are two options. Standard and Minimum Size:
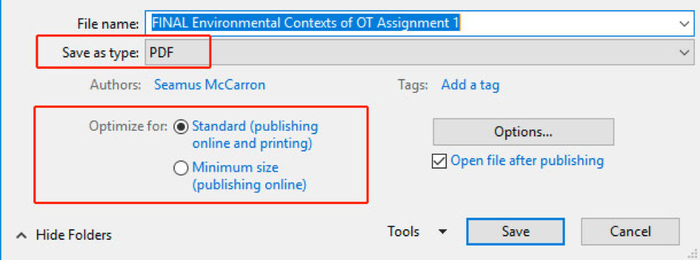
Standard (publishing online and printing): This is the default option and will reduce the size of your file.
Minimum size (publishing online): This produces the smallest file size. Please note, this is option is only suitable for viewing the file on a computer. It may give unsatisfactory printing results.
Reduce the size of an Office file (Mac OS)
Microsoft Office for Mac OS also comes with an option to reduce the size of the images in your document. Taking Word as an example:
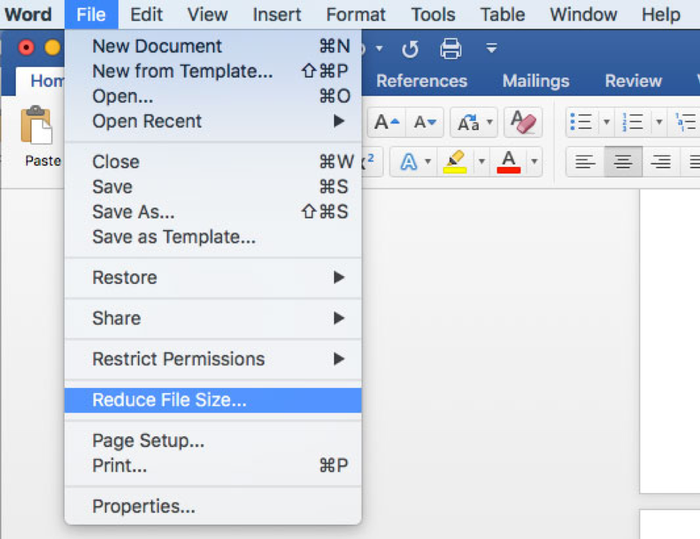
- With the document open in Word select File > Reduce File Size…
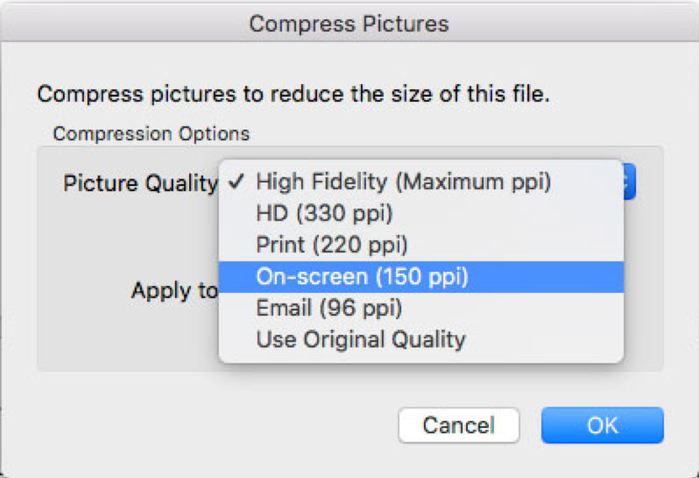
In the Reduce File Size option window that opens, from the Picture Quality drop down menu, select either:
Best for printing (220ppi): This is suitable for on-screen viewing and printing.
Best for viewing on screen (150ppi): This is suitable for viewing on a computer and makes a smaller file size. However, it may not be suitable for printing.
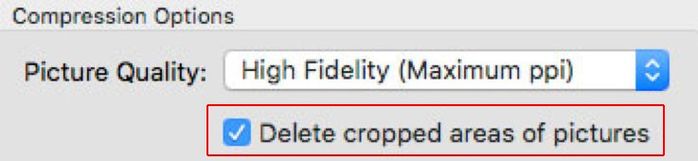
Make sure the Remove cropped picture regions checkbox is selected/ticked.
Finally, select the OK button.
Reduce the file size of a PDF using Preview (Mac OS)
The Preview application comes with Mac OS and, as its name suggests, allows you to Preview/View many files types - including PDFs. To use Preview to reduce the file size of a PDF, please follow these steps:
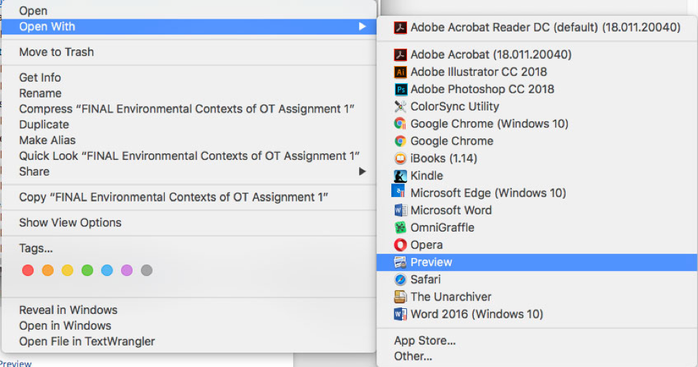
- Open the PDF using Preview. Some applications may override Preview as the default tool for opening PDFs. To get around this, hold down the CTRL key and left click on the PDF file and choose Open With… > Preview:
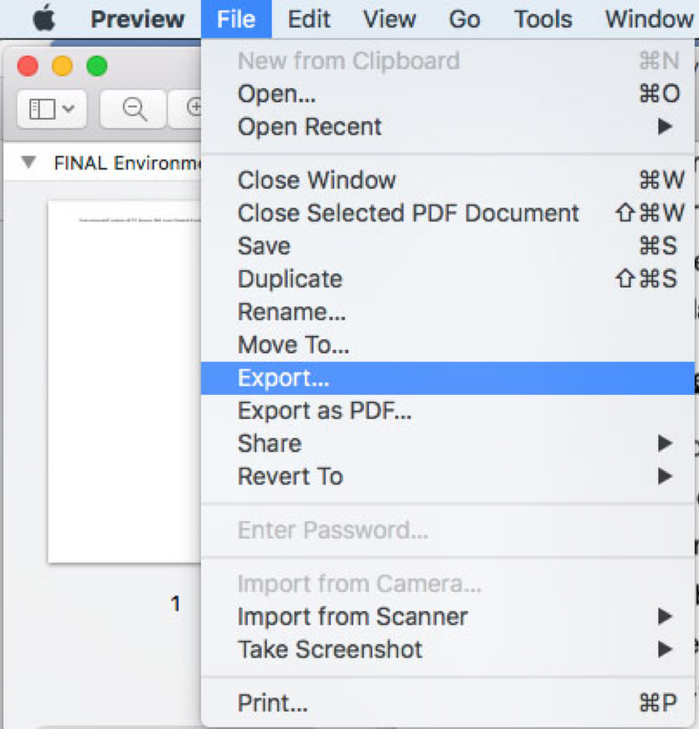
- With the PDF open in Preview, select File > Export.
From the drop-down menu next to Quartz Filter, select Reduce File Size.
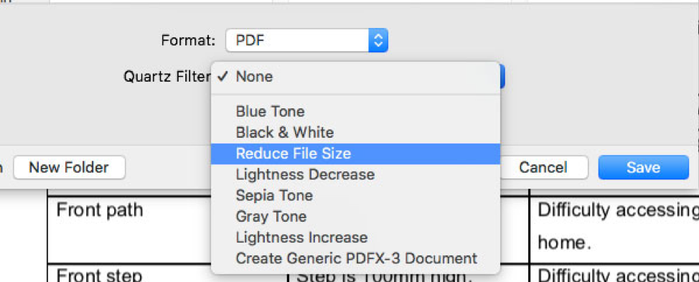
Note: Change the file name to make sure you don’t overwrite your original file.
- Select the Save button.