How to Complete Online Enrolment
- Gerard Ross
- ellen bell
Introduction
Now that you have accepted an offer of a place on a programme, or you are a successful returning student, your status in the University's Administration system changes to EL (Eligible to Register).
In order to proceed and receive access to your learning materials and University systems you will need to complete Online Enrolment which changes your status to RE (Registered). This is an important distinction as only registered (enrolled) students receive access to University systems such as Blackboard.
Sponsor Information
If your employer, a government agency or any other organisation apart from the Student Loans Company is paying your fees, IT IS VITAL that you first read the Sponsor Information section BEFORE beginning registration.
Tip
Detailed instructions for completing Online Enrolment can be found on this page: https://www.ulster.ac.uk/uuconnect/guide/how-to-register/enrolment-and-registration
Table of contents
Important
Please remember that having successfully completed online enrolment does not mean instantaneous access to Blackboard. Module choices must to be migrated to the Student Record system from which Blackboard takes its data feed. You should gain timely access to your course which typically commences on the first day of each semester, each academic year.
Instructions for Online Enrolment
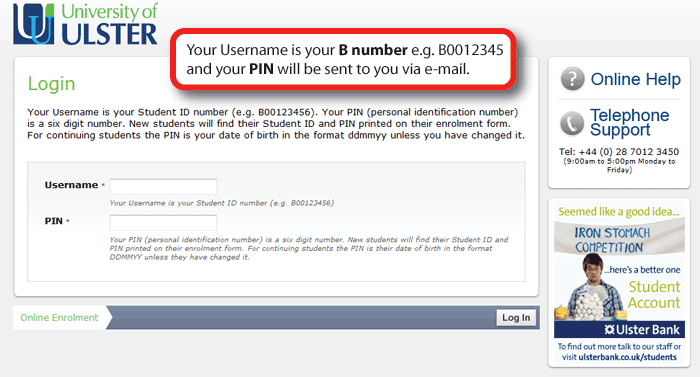
Login screen
- Go to the Online Enrolment Login page at: https://webapplications.ulster.ac.uk/ole/
- You will be asked to enter your Username and PIN number.
- Your Username is your B number e.g. B0012345 and your PIN will be sent to you by e-mail (only for new students, returning students already have their B number and Pin details).
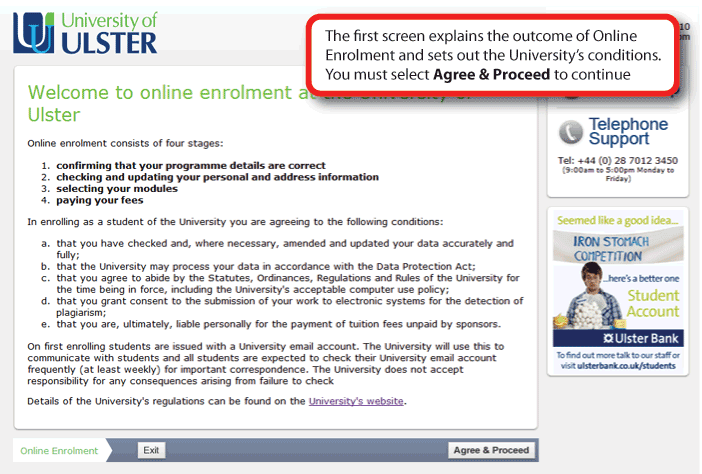
Welcome screen
- The welcome screen explains the outcome of Online Enrolment and sets out the University's conditions.
- You must select 'Agree and Proceed' to continue.
Tip
You can move back and forth within Online Enrolment at anytime. For your convenience, you can partially complete Online Enrolment and return later to fully complete. Please note however, that you must fully complete Online Enrolment to become an enrolled/registered student with access to University resources.
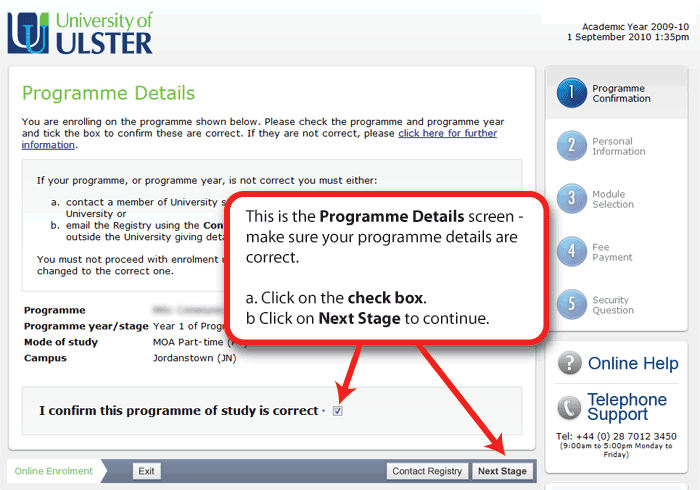
Programme Details screen
The Programme Details screen allows you to confirm your programme of study details.
- Confirm that your programme details are correct.
- If they are correct, select the check box next to the statement, "I confirm this programme of study is correct".
- Select the "Next Stage" button to continue.
If your Programme details are incorrect in any way, for example, if you are transferring onto another programme, or if you do not intend to attend your placement year and wish to progress to the final year of the programme instead:
- Select the "Contact Registry" button.
- Enter your Email address, contact telephone number and a brief message detailing the required amendment.
- Select the "Send" button.
An email will be sent to the Registry Office and you will be notified of the Programme amendment within 48 hours. At that stage you should be able to log on to Online Enrolment again and complete as normal.
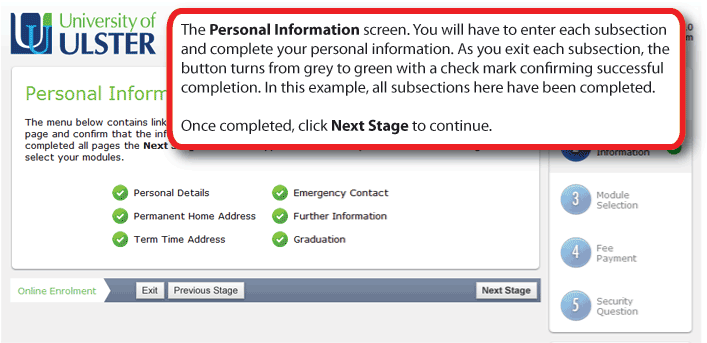
Personal Information screen
On the personal information screen you will be asked to supply - amongst other things - term and home time address's and emergency contact details.
- Complete each subsection of the Personal information screen.
- As you complete each subsection an green tick icon will appear next to each.
- Once completed, select the "Next Stage" button to continue.
Module Selection
There are four sub-stages within the module selection stage of online enrolment (though not all students will need to go through all of these.) All students, except research students, should enrol on at least one module. Students taking modules in the second semester MUST select these at enrolment at the start of the academic year. Students have two weeks at the start of each semester in which to add or drop modules.
Part-time students are reminded that University Regulations stipulate that part-time students may take no more than a maximum of 45 credits in semester 1, 45 in semester 2 and 20 in semester 3 (subject to course regulations). Students are responsible for ensuring that they do not exceed this study load.
NB Some students, for example research students, who do not normally take modules, can proceed to Stage 4 (Fees) of online enrolment after confirming that they are not taking any modules.
Mandatory Modules screen
If there are mandatory modules on the year of the course on which you are enrolling, these will be listed. Please ensure that each of the modules you are taking has a tick in the box beside the module. If there are two options available for a module code, please ensure you have selected the one with the right campus/semester (see note below). 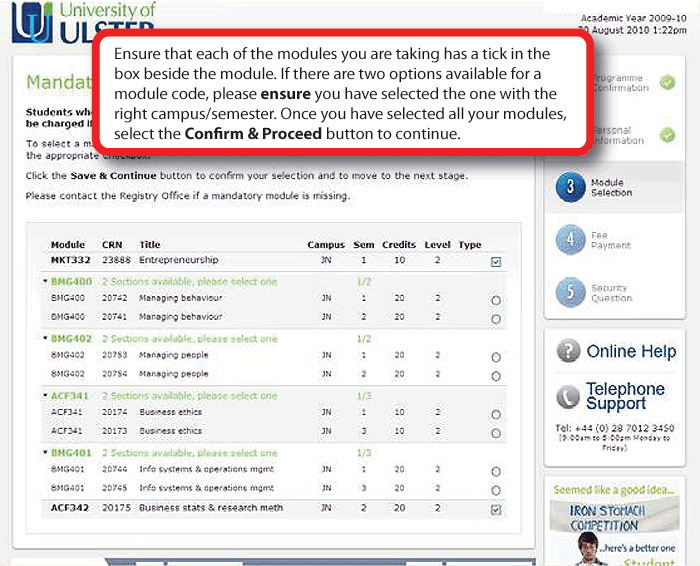
Please note: If there are only optional modules on the year of the programme you are taking then you will not be presented with the Mandatory Modules screen.
Optional Modules selection screen
Any optional modules available on your programme are listed in this part of Module Selection.
Please note: If there are only mandatory modules on the year of the programme you are taking then you will not be presented with the Optional Modules screen.
- Please tick the box against each of the optional modules you will be taking.
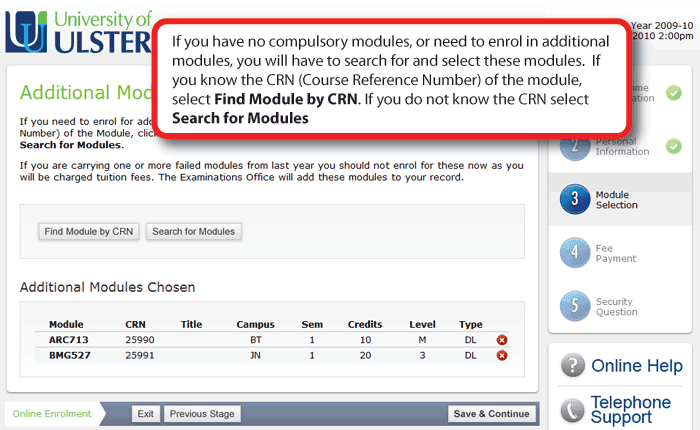
Additional Modules selection screen
If you have no compulsory modules, or need to enrol in additional modules, you will have to search for and select these modules.
- If you know the CRN (Course Reference Number) of the module, select "Find Module by CRN".
- If you do not know the CRN select "Search for Modules".
Once you have selected all your modules, select the "Save and Continue" button to continue.
Tip
If you have any doubts about the module selection, please contact your Course Director.
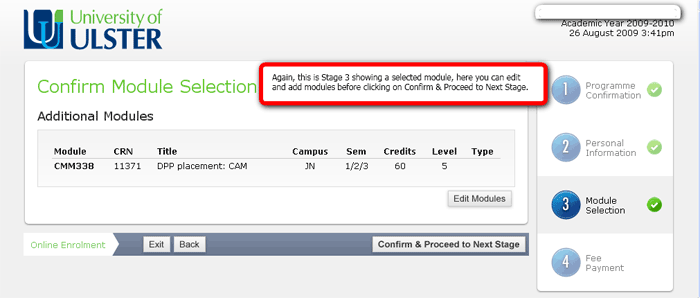
Confirm Module selection screen
This screen enables you to review your module choices. You may be prompted to delete/add modules if you have selected too many/not enough credit points for your specific mode of attendance.
- If you wish to drop any of these modules or to add others you can do so using the "Edit Modules" button.
- Once you are satisfied that your choice is correct click "Confirm and Proceed to Next Stage".
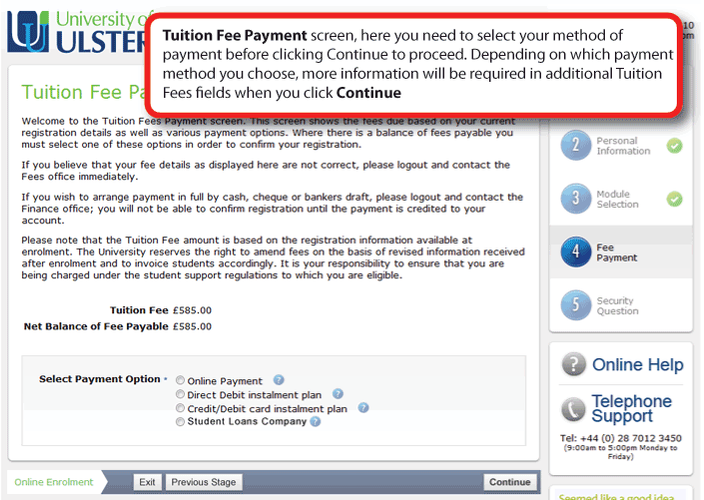
Tuition Fees Payment screen
This screen shows the tuition fees due based on your current registration details. Where there is a balance of fees payable you must select one of the payment options listed.
- Select your method of payment.
- Payment options are:
- Online Payment.
- Direct Debit instalment plan.
- Credit/Debit Card instalment plan.
- Student Loans Company.
- Select the "Continue" button to proceed with payment.
- Depending on which payment method you choose, more information will be required in "Additional Fee" fields when you select "Continue".
If you are having difficulty completing one of the fees options or wish to pay your fees by cash or cheque, exit the fees screen and either contact a member of Fees staff at the central enrolment area if you are enrolling within the University, or telephone the Fees Office on +44 (0) 28 7032 4252. Or visit the Cashier's Office on your campus if you are enrolling outside the University.
Important
You MUST select "Continue" after completing the Finance Section to move to the "Security question" screen. If you complete the Finance section and exit without proceeding to the Security question you will NOT complete Online Enrolment and NOT gain access to Blackboard.
Sponsor Information
If your employer, a government agency or any other organisation apart from the Student Loans Company is paying your fees, you must provide a letter to the Fees Office in advance of registration (Fees office contact details available here) in order for your account to be updated. You will not be able to complete registration until this letter is received and processed. If you are enrolling within the University and are only providing a letter on the day of registration, please contact a member of Fees staff at the central enrolment area.
The sponsor letter must detail your student ID number, the value of the sponsorship, course title and a name and address we can send an invoice to. If your sponsor requires a purchase order number to be quoted on the invoice, this should be included in the letter. A sponsor letter is required each academic year even if your sponsor details have not changed. If your sponsor is only part paying your fees, you will be required to pay any personal contribution or else set up an instalment plan at registration.
Where to send your sponsor letter
Please DO NOT send you sponsor letters to the Blackboard Support e-mail. They MUST be sent to the Fees Office.
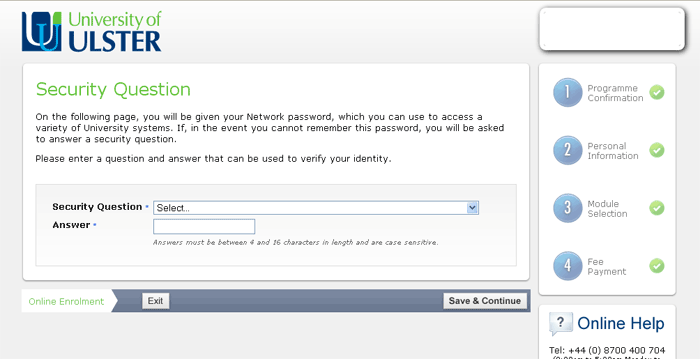
Security Question screen - Essential Step
It is essential that you complete the Security Question screen. Completion of this step will give you access to Blackboard based learning materials and other University systems.
- Select a Security Question from the drop down list.
- Supply an answer that is between 4 and 16 characters long.
- Select "Save & Continue" to proceed to the final screen.
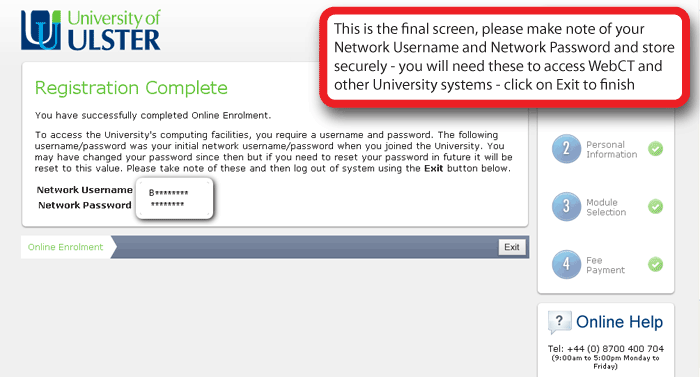
Registration Complete screen
Well done!, your online enrolment is complete. This page will give your initial University network username and password.
- Make a note of your Network Username.
- Make a note of your Network Password.
- Select the Exit button to log out.
Useful information
Problems with Online Enrolment
If you have problems enrolling online, the Registry Helpline number is +44 (0) 28 7012 3450 and it is open from 9 00 am to 5 00 pm. Alternatively, email your campus Registry Office as follows:
- Coleraine: RegistryCE@ulster.ac.uk
- Jordanstown: RegistryJN@ulster.ac.uk
- Magee: RegistryMG@ulster.ac.uk
- Belfast: M.Chatterley@ulster.ac.uk
Or via the web at: http://www.ulster.ac.uk/academicservices/student/common/contactus.html
Find what campus your course belongs to
You can identify both your Campus and Faculty by looking up your programme on the online prospectus at: http://prospectus.ulster.ac.uk
Tuition Fee Office contact details
University of Ulster
Student Fees Office
Cromore Road
Coleraine
BT52 1SA
Telephone: +44 (0)28 7012 4252
Fax: +44 (0)28 7012 3255
E-mail: fees@ulster.ac.uk
Web address: http://www.ulster.ac.uk/finance/fees/
Semester start dates
You can check semester start dates at: http://www.ulster.ac.uk/academicservices/staff/Dates%20of%20Semesters%202009%20-%202014.pdf