Using Panopto Capture
- Gerard Ross
Introduction
Panopto Capture is a browser-based capture tool that allows staff and students to record audio, video and entire screens or application windows. Panopto Capture can be accessed directly from within a supported browser. There is no need to download or install any additional recording applications or browser extensions.
Table of contents
Important: Panopto Capture has just been released from Beta. There may be undocumented issues or bugs. If you encounter any problems with this feature, please contact the Blackboard Helpdesk.
Supported Browsers

At the moment Panopto Capture only supports the latest versions of the following browsers:
- Firefox (Windows and macOS versions)
- Google Chrome (Windows and macOS versions)
- Chromium based Edge for Windows. This is a recently released version of the Edge browser and must be downloaded and installed separately. * Installing this browser will replace the legacy version of Microsoft Edge on Windows 10 PCs.
For the most consistent experience we recommend using Panopto Capture with Google Chrome.
Who can use Panopto Capture?
To use Panopto Capture you will need to have Creator access to Panopto.
Anyone with Instructor or Course Builder access to a module area in Blackboard Learn will have Creator access by default.
Note: If you haven’t already, see our Using Panopto with Ulster University Blackboard support page for advice on setting up Panopto in your module area
- If you are non-teaching member of staff, you can request your own Personal Development Area via the Module Manager and this will give you the required Creator access to Panopto. Please contact the Blackboard Helpdesk if you need help doing this.
- Students have access to Panopto Capture via the Panopto Video Assignment tool.
How to make a recording
How to Launch Panopto Recorder
To launch Panopto Recorder:
- Login to Blackboard Learn at https://learning.ulster.ac.uk.
- Go to a module area where you have Panopto set-up.
- Select the Panopto Course Tool Application link you added to the module menu when you provisioned it with Panopto.
- This will take you to the Panopto folder for the module area.

- Select the green Create button at the top of the screen and choose Panopto Capture from the drop-down menu that appears.
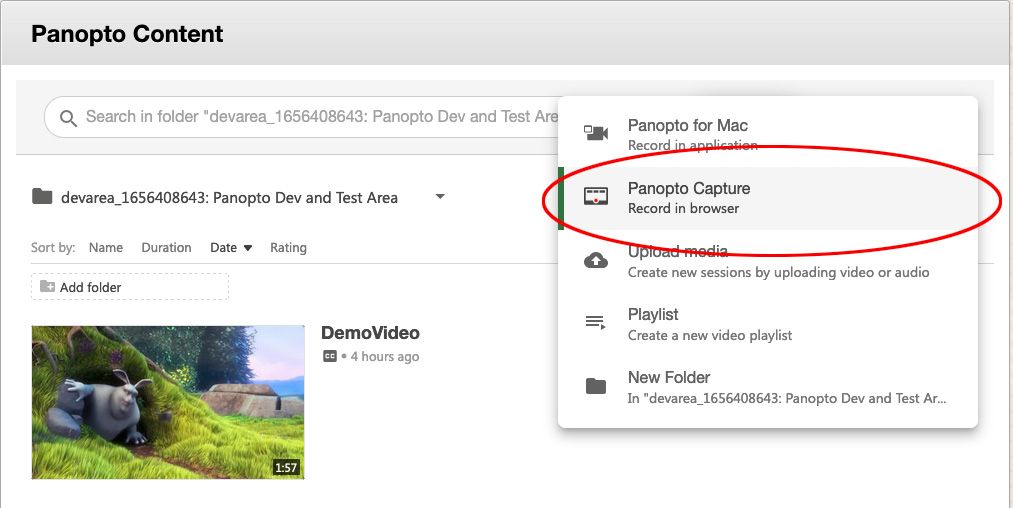
- Panopto Capture will then open in a new browser tab.
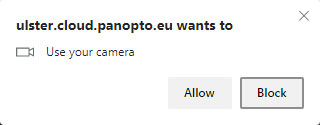
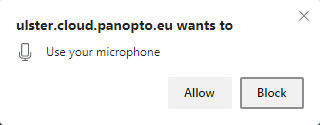
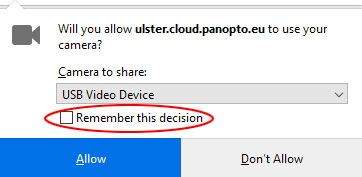
You may see on-screen prompts at the top of your screen asking for permission to use your microphone and/or webcam. Be sure to allow access by choosing the Allow button.
Note: Firefox users should select the Remember this decision checkbox to stop these prompts for appearing every time they access Panopto Capture.
Select an Audio Input Device
You will need an audio input source to record audio. Videos recorded without audio will fail to process.
To select an Audio Input Device:
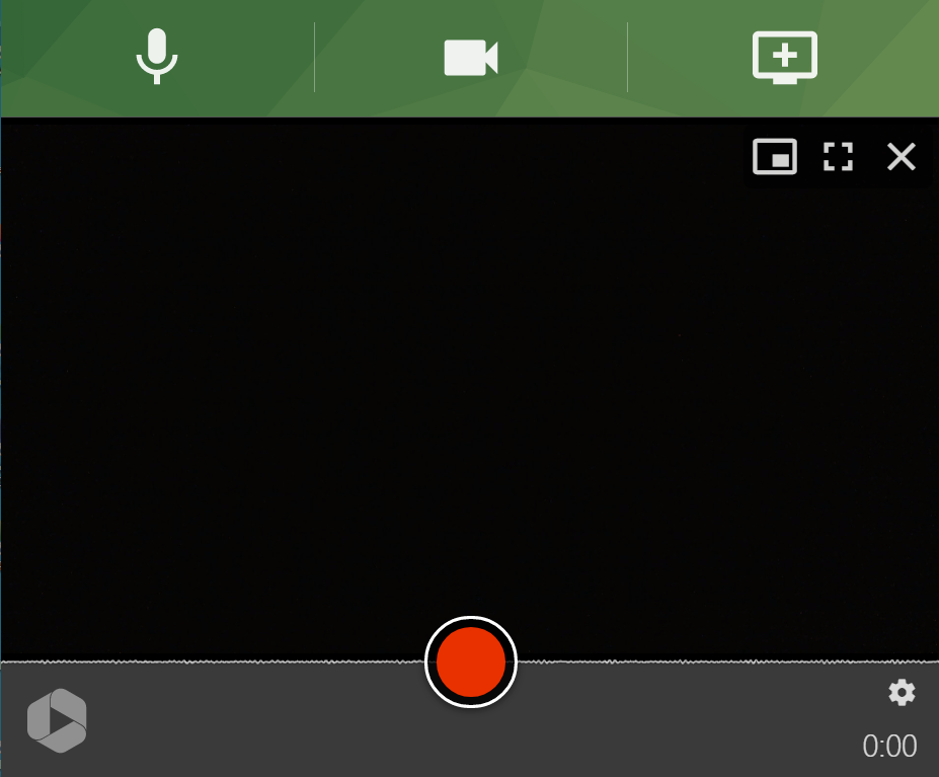
- Select the microphone icon at the top left-hand corner of Panopto Capture.

- Any active microphone connected to your computer will be listed on screen. Select the microphone you wish to use by clicking on its name. A tick will appear below the selected audio source.
In the example below (highlighted in red) I have chosen to use the Microphone (Parallels Audio Controller):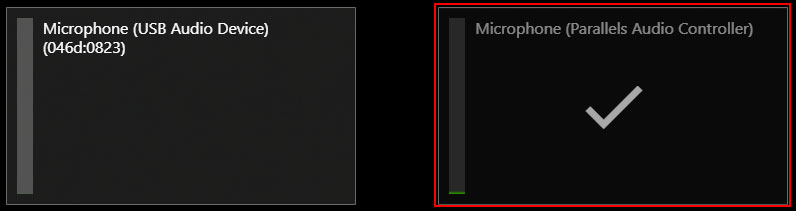
Talking at a normal volume will allow you to test your microphone. The bar at the left of each box indicates how well the microphone is picking up audio.
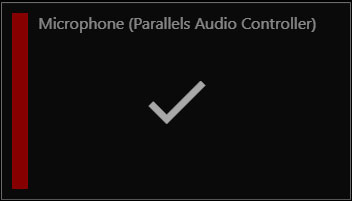
Note: At normal levels the audio bar should be green. If the audio bar is yellow or red, the video's audio may be distorted or too loud. If no colour is showing, the microphone is not picking up audio.
Select a Video Input Device
You will need a camera/video input source to record video e.g. Webcam. If you do not want to record any cameras, you can skip this step.
To select a Video Input device:
- To record a camera source e.g. webcam, select the camera icon at the top of Panopto Capture.

- Any active camera/webcam connected to your computer will be listed on screen. Select the camera you wish to use by clicking on its name. A tick will appear below the selected video source.
- The first camera selected will be recorded as the primary video source. This source appears in the upper left-hand side of the video viewer.
- Any additional cameras selected will be recorded as secondary video. These appear on the right-hand side of the viewer along with any screen or application sources.
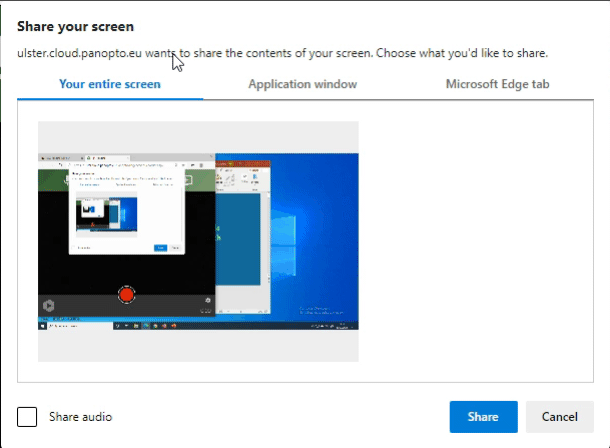
Select Screen and Application Sources
Panopto Capture also has the ability to capture a screen, application window, or individual browser tab. If you do not want to record any screens or applications, you can skip this step.
To capture the screen, application window, or individual browser tab:
- Select the monitor icon at the top right of Panopto Capture.

A new window will open. Here you can choose the source to record.
- To record everything that happens on a screen, choose Your Entire Screen. Then, select the screen to record and select the Share button.
Optionally, select Share audio to add the audio from your computer to the recording.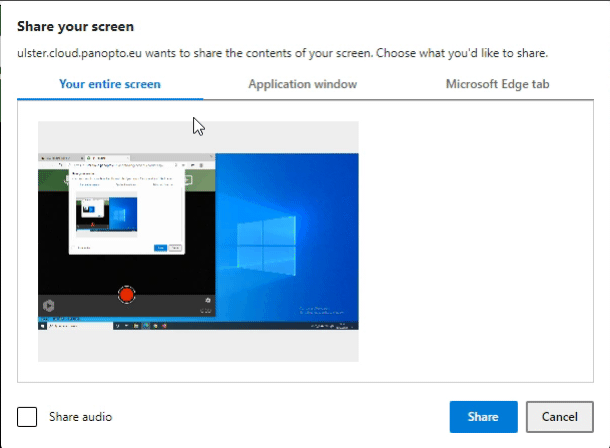
- To record everything that happens in one application window, choose Application Window. Then, select the application to record and select the Share button.
- To record everything that happens in one browser tab, choose <Browser Name> tab. Then, select the title of the browser tab you want to record (from the list shown) and select the Share button.
Optionally, select Share audio to add the audio from your computer to the recording.
- You may add additional sources by selecting the monitor icon again.
Note for Firefox Users
Important: Firefox users won’t have access to the options shown above, instead they will be shown a drop-down list of all tabs, windows and open applications and will have to choose from this instead.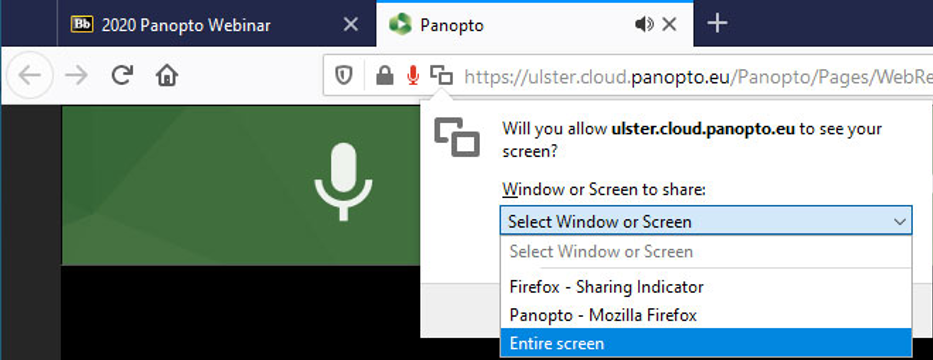
In addition, Firefox users can only temporarily allow screensharing, because of this, do not select the Remember this decision check box. You will be unable to screenshare if you do:

Video Preview
Panopto Capture will show a preview of all your selected videos sources on screen. To remove a video source, hover over the preview of the source and selected the ‘X’ button to close it (highlighted in red in the image below).
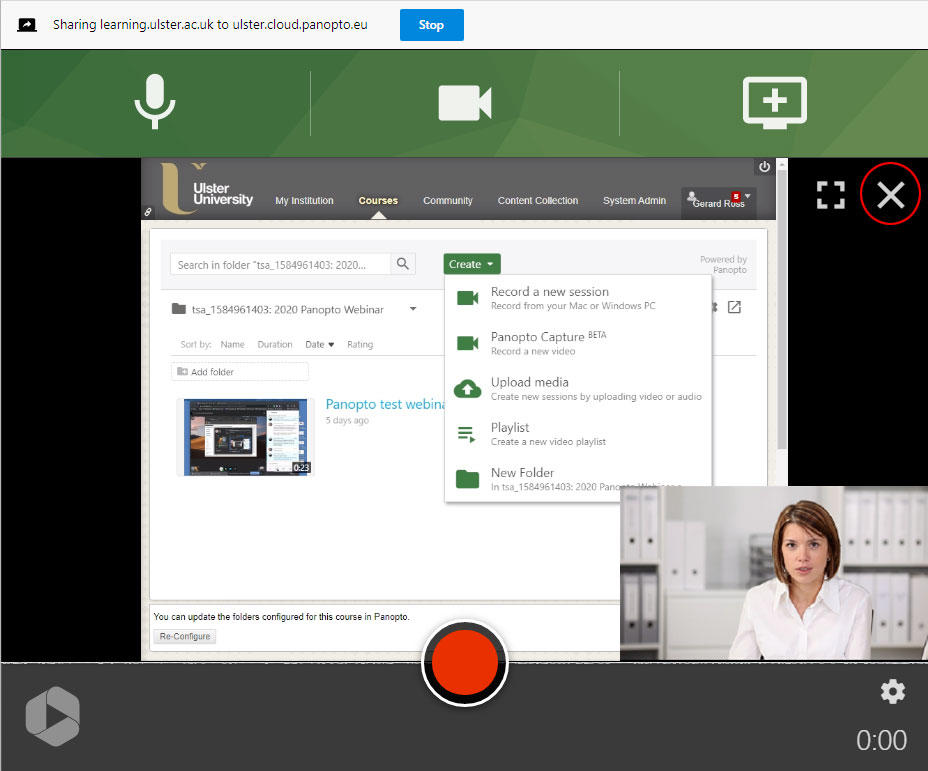
In addition, Panopto Capture will show a small audio waveform near the bottom of the screen. This will rise and fall with your voice.

Recording the Video
If you’re happy with the video preview and can see that your audio is working, you can start your recording.
To do this:
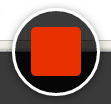
Select the red record button at the bottom of Panopto Capture to start recording.

Note: If the countdown option has been enabled, you will see a 5 second countdown on screen before recording starts.
To stop recording, select the red square button at the bottom of Panopto Capture.
Important: When you select the Stop button the video will immediately begin to upload. Do not close the Panopto Capture browser tab until the upload is complete. You can safely close the window when you see the message saying, ‘Getting your video ready for editing’.

Video Upload and Processing
When the recording is stopped, the video will immediately begin uploading to My Folder in Panopto. This is the default upload location. A new window appears that shows the video's upload and the processing progress. Even before processing is complete, you can select the Share button (highlighted in red in the image below) to invite others to view your video.
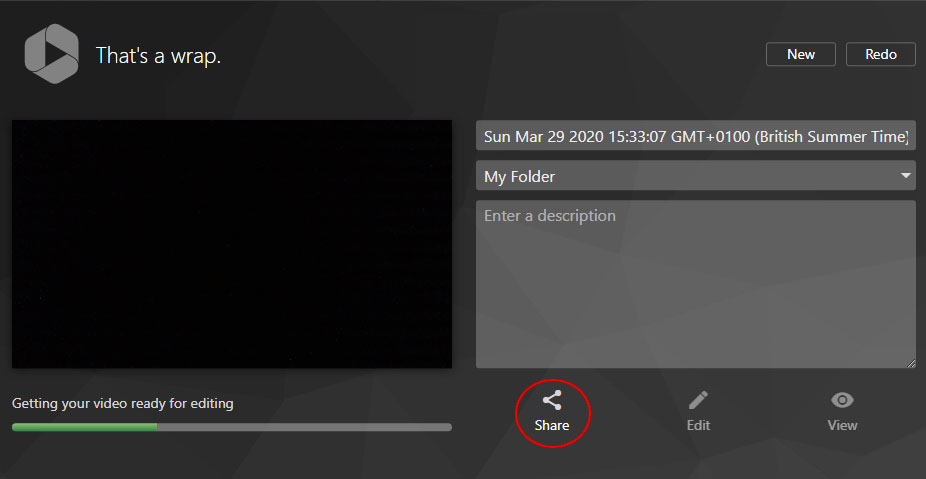
Note: Do not close your browser tab until uploading is complete. Uploading is complete when the status bar reads, ‘Getting your video ready for editing’.
- Change the name of your video using the title box on the top right-hand side of the screen. Use the description box to provide information about the video.

- To change the destination for the next video upload, use the drop-down menu to choose from a list of all your Blackboard Learn modules*.
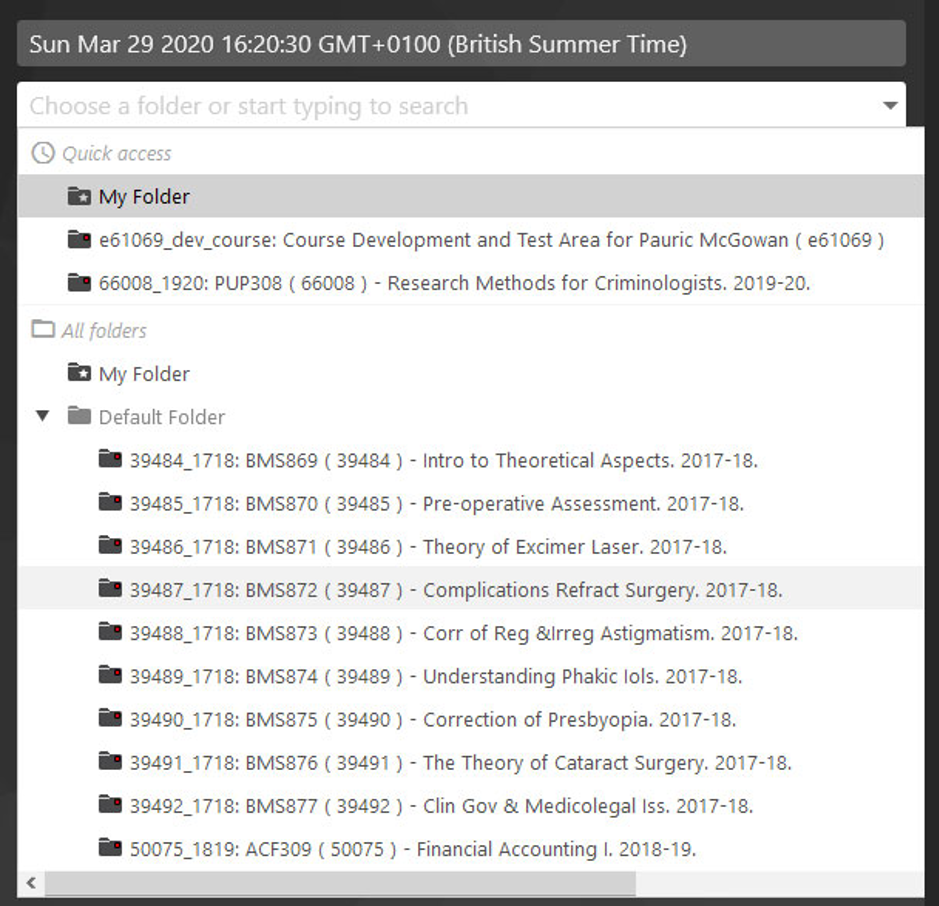
* Only those modules that have been provisioned with Panopto will be shown. - When the video has finished processing, you can edit or view the video:


- If you need to record your video again, instead of saving, select the Redo button at the top right of the Panopto Capture screen.

- Select the New button to record another video.

Embedding and Sharing your Video
When your video has finished processing, it will be available in My Folder - or the learning module you selected when uploading the video. From here you can embed it in your module content or share it with others. For detailed instructions on embedded Panopto videos, please see our Using Panopto with Ulster University Blackboard support page.
Video Instructions