Tips for recording videos
- Gerard Ross
Introduction
The following tips are intended to help staff and students recording videos for use with Panopto. We hope you find them useful.
Table of contents
Choose lowest available video recording quality
Most mobile devices default to the highest quality of video recording i.e. High Definition (HD) or higher. While this gives the best quality video, it comes at the expense of file size.
As a rule of thumb, 1 minute of video at 720p is roughly 60MB in size, 1 minute at 1080p will be 130MB and 1 minute at 4K is roughly 375MB. As you will need to upload these videos, it’s a good idea to reduce the size of the file you’re attempting to upload. How you do this depends on the device you’re using:
Change recording quality iOS
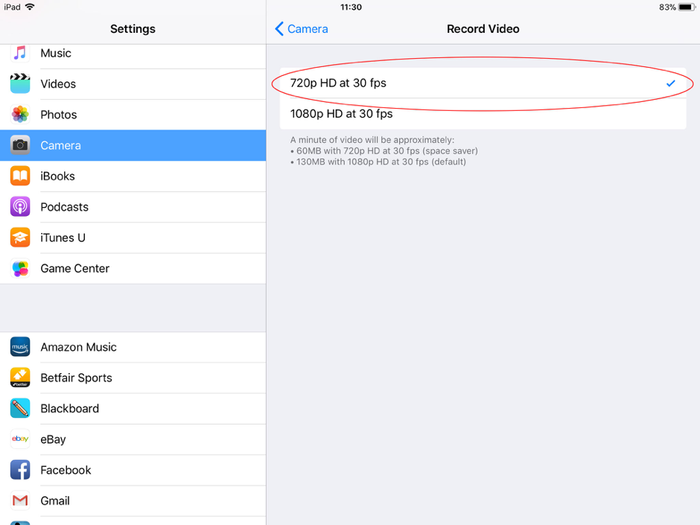
In the latest version of iOS (12), the video recording quality can be changed in the Settings section under Camera. Tap the Record Video option and change the current setting to the lowest available. In the example below, it has been changed from 1080p at 30fps to 720p at 30fps.
Settings > Camera > Record Video > select 720p HD at 30 Fps or lower (were available)
Change recording quality Android
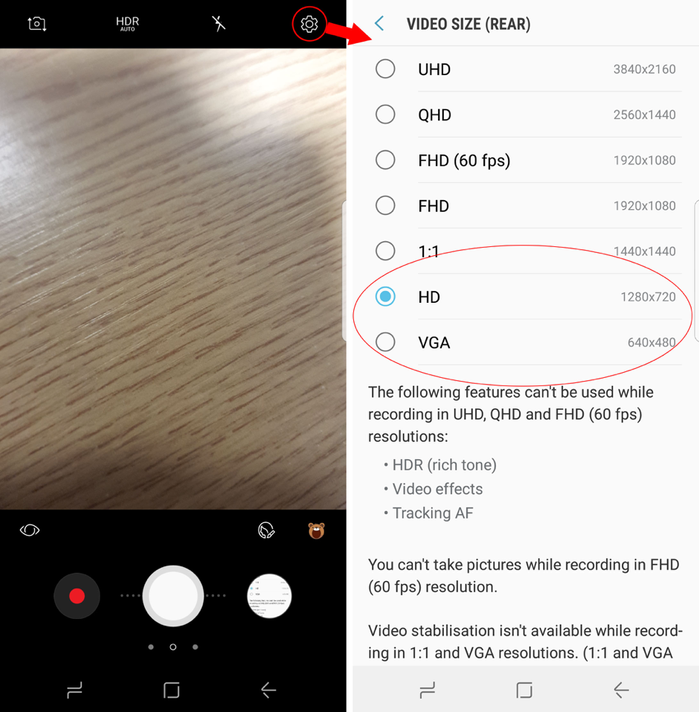
Given the number of “flavours” of Android that are available, it’s difficult to give precise instructions for changing the quality of Android’s video recording. However, start the Camera and look for a settings icon e.g. cog or ellipse “…” tap this, and look for Video Quality or Video Size. Tap this option and from the list of available options choose the lowest quality available. In the example below HD 1280x720 has been chosen as the VGA option (640x480) is very poor on this particular device (Samsung S8).
Launch Camera > Settings Icon > Video Size (Rear) > select HD (1280 x 720) or lower (were available).
 700
700
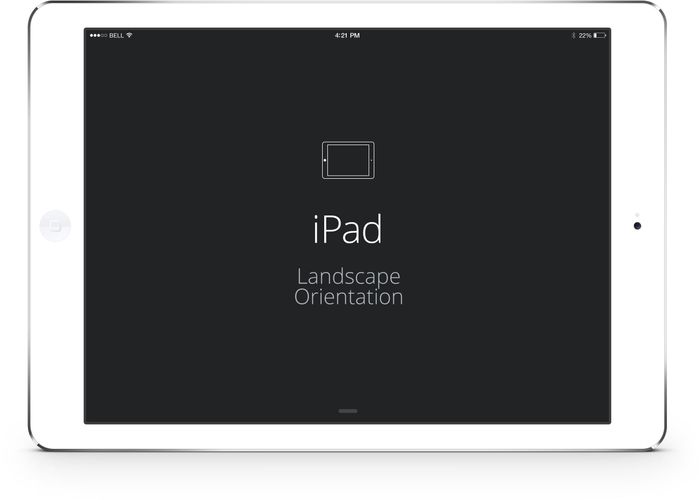
Record in Landscape
Make sure to use landscape orientation and not portrait orientation while recording. This will prevent two black vertical bars along both sides of your video. Not only does landscape make your video seem more aesthetically pleasing, it'll also make it more enjoyable to watch when viewed full-screen. Plus, you'll capture more in the actual video.
So just remember: never hold your phone vertically while recording. Always hold it in landscape orientation:
Fill the frame
Now that you're recording in the proper orientation (see 'Record in Landscape' above), completely fill the frame with your subject. You can also put your subject slightly off-center to create a more visually interesting scene. If you’re too far away, the other objects in the room will distract from the subject of the video.
Also, being closer to the subject will move the device’s microphone closer and improve the audio quality. In general, you should always get as close as you can, especially for tight shots on faces.
Stay away from digital zoom
Avoid the urge to use the device’s built in zoom feature to get closer to your subject. Most smartphones unfortunately feature digital zooms, which are just software tricks that'll make your subject appear closer but with severe pixelation. In order to zoom in while recording without losing the crisp quality you want in videos, you'll have to get closer to your subject.
Don’t cover the microphone
In general, an iPad’s speakers are on one edge (near the home button) and the microphone is on the opposite edge, near the front-facing camera. There is a tiny hole on the edge for the mic, and another hole nearby, on the rear, for noise-cancelling.
Most mobile phones have the microphone at the bottom edge of the device near the charging port.
For the best audio quality, try not to cover the microphone with your hand when holding the device in landscape mode. Avoid tapping the microphone, or moving your hands too much while recording….as this will be picked up.
Backlighting is bad
While you may be able to see people and their faces when they're backlit e.g. with a projector screen behind them, your mobile devices’ camera usually can't and will output footage with a bright light haloing a dark figure. The subject will have no visible features and will appear in silhouette.
To avoid this situation, try considering the lighting and positioning of your subject. Get as much natural – window - light as possible and consider standing your subject beside – but not in front of - a window or projector screen. Those of you who are recording on the fly can also improve a backlit situation by moving to one side or another. Some smart phones video apps do try to reduce the effects of backlighting; however, you can reduce the problem with a good choice of location. Alternatively, use a fill-in light to brighten your subject.
Location
On the subject of location for recording, choose a quiet room, away from distractions and the general flow of other people in the corridors outside. Old, wood-floored or high ceiling rooms should be avoided because of problems with echo affecting audio quality. Carpeted rooms are ideal, as are those with shelves lined with books etc. as these tend to cut down on echo and external distractions.
Steady the device
Even if you’re just using a stack of books, rest your mobile device rather than hold it. Even a few minutes of hand holding a mobile device can be tiring and lead to shaky video. Newer phones may have built-in image stablisation, if this option is available, turn it on.
Maximum file size
Earlier, we mentioned reducing the quality of the recorded video to minimise file size.
Theoretically, Panopto can accept submissions up to 2 gigabytes in size, however, when you think that an entire DVD Movie is 4.7 gigabytes, if you’re uploading a 2 gigabyte video that is only 15 minutes long, something further may need to be done to reduce the file size.
Uploading your videos
If you’re using a mobile device and have access to a campus location it is HIGHLY RECOMMENDED that you use to the university’s Eduroam Wi-Fi network as your Wi-Fi source when uploading videos.
While most home internet service providers give good download speeds, the vast majority have very much slower upload speeds. The university’s Eduroam Wi-Fi network is much faster in terms of upload.
A full list of instructions for connecting different devices to Eduroam can be found here:
https://www.ulster.ac.uk/ds/services/wireless-services
iOS specific instructions for joining Eduroam can be found here:
https://www.ulster.ac.uk/__data/assets/pdf_file/0018/94140/iphoneb.pdf
Android specific instructions for joining Eduroam can be found here:
https://www.ulster.ac.uk/__data/assets/pdf_file/0010/94096/androidb2.pdf
Do not attempt to submit your video via your mobile network e.g. O2, EE as this will be slow and incur significant data charges. If you do decide to use you own Wi-Fi to submit, be prepared to wait a long time for a video to upload.
Editing the video
While not necessary, if you feel you need to edit the video before submission, there are a number of editors available for mobile devices. The iOS version of iMovie is now free on the App store. FilmoraGo and Adobe Premiere Clip are free editors for Android devices. Any of these apps will allow you to edit your recorded video and export the finished product at different video qualities. However, instructions on how to use these apps is beyond the scope of this document.
Alternatively, connecting your device to a computer will allow you to download your video and edit it using popular video editors such as Camtasia Studio (PC and Mac), Photos (Windows 10 PC), Screenflow (Mac) and iMovie (Mac).
Note: Windows Movie Maker is no longer available for download.
You may also consider using Miro Video Convertor and Adapter – both available for OSX and Windows – to optimise your edited videos for file size. Again, instructions on how to use these tools is beyond the scope of this simple support page.