Enhanced Group Management Tool
- Gerard Ross
Introduction
The Enhanced Group Management tool enables you to quickly add or remove a batch of students with the 'same' criteria e.g. Programme Code into a 'pre-created' group. For example, you might use this tool to split large numbers of students into separate groups for marking by your e-tutors.
Table of contents
Create the Groups
You must first create a group or groups via the Users and Groups section of the modules. The steps below outline the quickest way to do this via Manually-Enrolled groups:
- Login to Blackboard.
- Select Groups from the Control Panel under Users and Groups.
- Select the Create Single Group and select Manual Enrol.
- Type in an appropriate Group Name and provide a description of the Group.
- Select Yes to make the Group available.
- Select the Tools available to the Group by selecting the appropriate check boxes.
- You do not need to choose any groups members at this stage. You will be adding students to these groups using the Group Management tool.
- Select the Submit button to create the Group.
- Repeat the previous steps for each of your groups.
Tip:
Think carefully about naming conventions for the groups. Should they begin with the instructors names e.g. colette_murphy_group_one or will the name of the assignment mean more to your students? e.g. assignment_one_group_one
Using the Enhanced Group Management tool
Adding the tool to your module
The Group Management tool isn’t available by default. You will have to add it to your module area. To do this:
- Select the Customisation link in the Course Tools menu.
- Select the Tool Availability link.
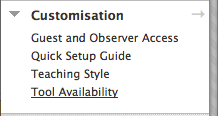
- The Tool Availability page will open. Scroll down the page and select the Available checkbox to the right of Enhanced Group Management Tool.

- Select the Submit button to save your changes.
- The Group Management tool will now be available under Course Tools.
Using the tool
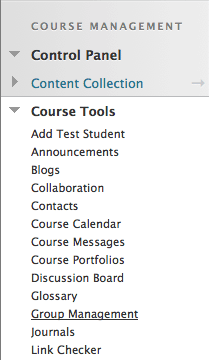
Access the Group Management Tool from the Control Panel:
- Go to the Control Panel.
- Select the Course Tools link
- Select Group Management. The Group Management window will open.

- Select your Group Name from the Selected Group Box.
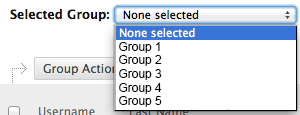
- Sort the Department/Programme Column by clicking on the Department/Programme Column column heading - this allows you to collate together those students studying the same Programme.
- Select your Students from the list by selecting the check box to the left of their Username.
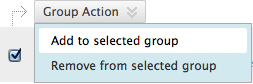
- Add Selected Students to User Group - By selecting Group Action and choosing Add to Selected Group from the drop-down menu.
Using the groups you’ve created
Adaptive Release by Membership
This will come into play, if you wish to disseminate content to your User group(s) only. I am assuming you have create a content folder(s) and upload the necessary resources, content items you wish to provide to your students.
- Select Adaptive Release from the contextual menu on the item you want to add Release by Membership.
- The Adaptive Release page will appear. Go to the Membership section.
- You can use the arrows to move the groups that you have created across from Items to Select to Selected Items.
E-mail Group members en masse
The facility to e-mail individual groups exists within Blackboard. This is done through the Groups page. To do this:
- Go to the Control Panel.
- Select the Course Tools link.
- Select the Groups link.
- You will be presented with a list of all your group names.
- Rollover a group name, the options menu drop-down icon will appear. Select the icon and from the drop-down menu select E-mail.
- Compose your e-mail and select Send.