Creating and Grading a Blackboard Assignment
- Gerard Ross
Introduction
The Assignment Tool within Blackboard Learn is a way to deploy, receive, and grade student assignments digitally. Instructors have the option to view the assignments online via Grade Attempts, Grade Anonymously, or Grade Details.
Table of contents
Creating the Assignment
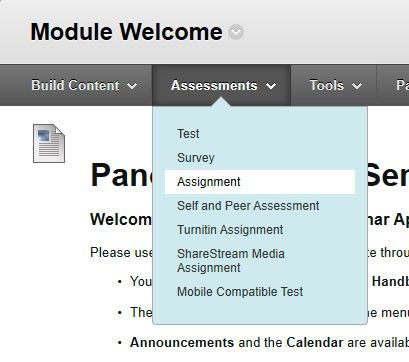
- Select the content area where you want to place the assignment and roll over the drop-down Assessments menu and select Assignment.
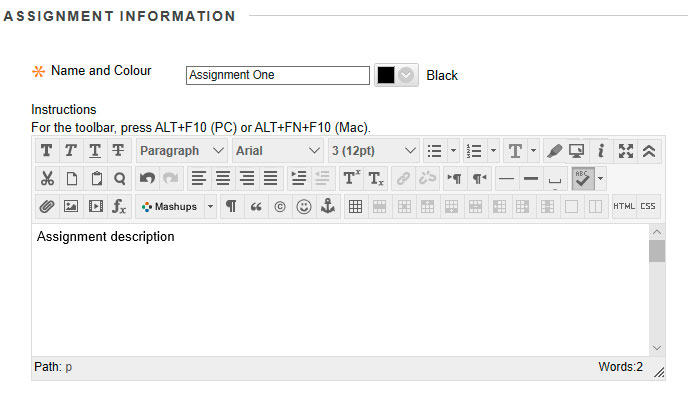
Fill in the Name of the assignment and use the instructions area to provide details about the assignment.
Note: The assignment name will automatically create a column in the Grade centre.
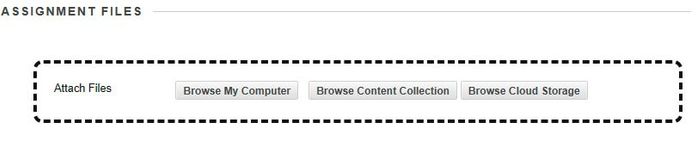
- If necessary, you can also attach supporting file(s) to the assignment. Select the Browse My Computer button and select the file you wish to attach.
- In the Grading section, assign points possible.

- In the Availability section, you have the option to allow a single attempt, unlimited attempts, or a specific number of attempts. The Limit Availability, Display After and Display Until options allow staff to ‘hide’ the Assignment from students until the set date and time.
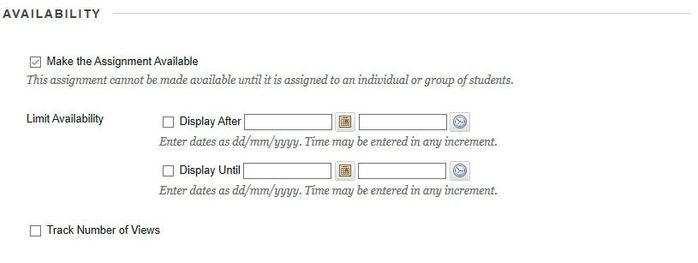
- You can also set a specific Due Date. Submissions will be received after this date but will be marked as being Late.

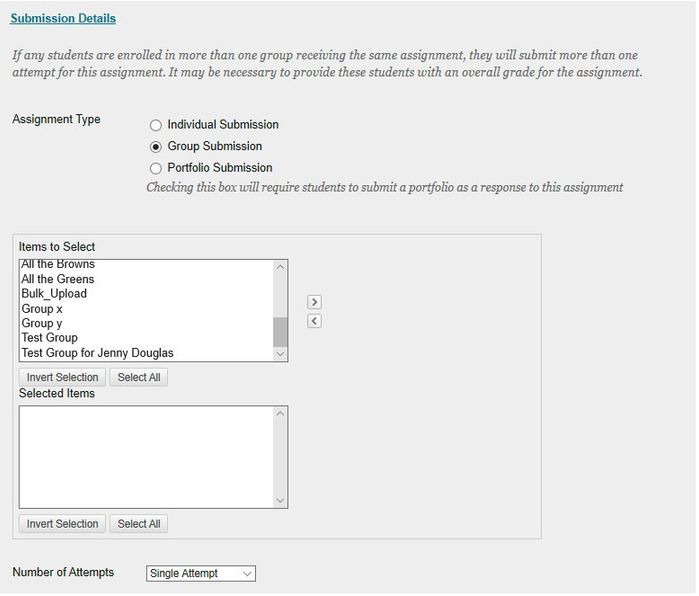
- If your assignment is a group assignment, you have the ability to select the Groups of Students option in the Recipient section and specify which groups see the Assignment.
- Select the Submit button when finished.
Accessing Submitted Assignments
Submitted student assignments will show up in the Grade Centre. You can choose to download them individually or all at once.
- Go to the Control Panel, select Grade Centre and then Full Grade Centre.

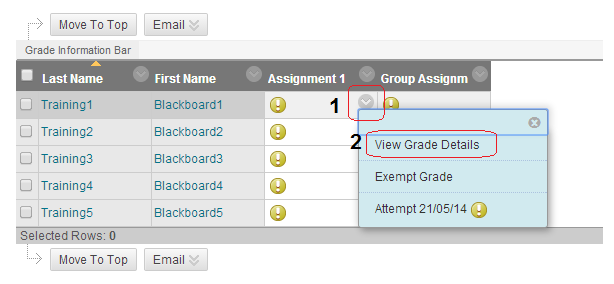
- Any assignments that have been submitted will show up as an exclamation point
 in the appropriate assignment column.
 - To download the assignments individually, rollover a cell with an exclamation point icon and select the drop down arrow that appears. Select the View Grade Details option.
- The Grade Details window will open.
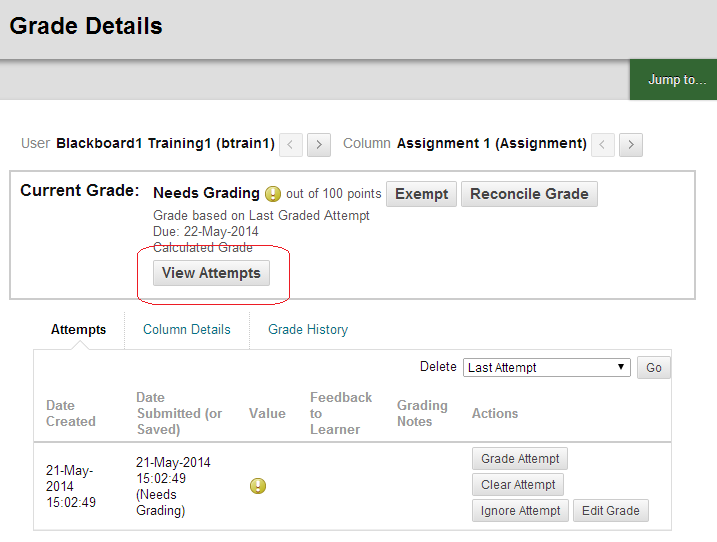
- To view the students attached file select the View Attempts button.
The Grade Assignment window will load. You can also download the submission by using the drop down icon beside the file on the right hand panel.
Tip: It’s a good idea to establish a naming convention for submitted documents. If you’re reviewing 40 documents with the same title it can be confusing to know who owns what. It may be an idea to have students to prefix the filename with their B number e.g. B00123456_documenttitle.doc
- In Grade Assignment you can also assign points, insert comments (annotations) for student feedback, type instructor notes (only visible to the instructor) and attach notes.
- Select the Submit button when finished.
Accessing Multiple Submissions
To do a mass download of all your student’s files:
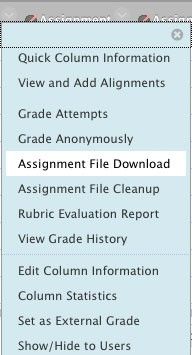
- Select the top cell of the appropriate assignment column and select Assignment File Download option from the drop down list.
- Use the checkboxes to select those submissions you want to download and select the Submit button.
- The Download Assignments screen will open. Select the Download assignments now link.

- You will then be prompted to save them to your local machine or to view them in your browser. Your student’s files will be zipped into a single .zip file.
Once the zip file is downloaded, navigate to where you saved the file and double click on it. The zip file will be expanded – Windows users will have to select Extract All or a program such as WinZip to do this.
Tip: For each submission there will be 2 files. The .txt file will contain any comments that the student submitted. The .doc or other file will be the document itself. Note that the Student login and assignment name is appended to all documents.
Issue: Multiple Submissions issue for students
When an instructor allows for multiple submissions, the Instructor comments/Grade data is tied to the first submission ONLY.
If a comment or a score is entered in the 2nd submission field in the Grade Centre, it appears as though the instructor hasn’t graded or given any comments because the student see’s a yellow exclamation point in their My Grades area. Students need to select the yellow exclamation point and then select on the plus + sign to expand their attempt comment or score.
Adding Grades
Grades can be entered into the Grade Centre in a variety of ways. Results from online tests and surveys are automatically entered into the Grade Centre. Excel spreadsheets, can be exported and imported into the Grade Centre and grades can be entered manually.
Needs Grading Page
Instructors can access assignment and test attempts that need grading or reviewed from the Needs Grading page. To start grading this way:
- Go to the Control Panel, select Grade Centre and then the Needs Grading link.

The Needs Grading window will open. Select the Grade All button, which will place attempts in a queue for easy navigation between submissions.
Note: Once an attempt is graded or reviewed, it no longer appears on the Needs Grading page.
Manually Entering Grades
You have two options for manually grading submissions.
- Enter grades via the Grade Centre cells. Rather like you would do in a spreadsheet.
- Override a student’s grade.
Enter grades via the Grade Centre cells
- In the Full Grade Centre page, enter a grade by selecting the cell in which you would like to put a grade (you may need to scroll to the right to find the column) and type the grade directly into the cell.
- Press Enter on your keyboard to save the grade. The cursor will now be moved to one cell down by default.
Override a student’s grade
- From the drop down menu next to any graded item select View Grade Details.
- Select the Manually Override tab. You will then be able to enter the grade.
- Select Save Return to Grade Centre.
Downloading and Uploading Grades
Instructors can upload grades from external sources such as a Comma-separated Value .csv file or an Excel spreadsheet. Data must be formatted specifically to upload correctly and be synched with existing Grade Centre data. The simplest way to do this is to first download the Grades from the Grade Centre. To do this:
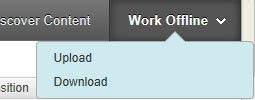
- While in the Grade Centre, rollover the Work Offline button and select the Download link.
- Select the Data to Download and the desired Options. e.g. Full Grade Centre
Choose My Computer for the Download Location.
Note: We recommend saving the data file on your local computer.
- Select the Submit button, Download and OK buttons.
- You may now open the file in Excel on your computer and enter the grades manually.
- The amended grades file can then be uploaded into the Grade Centre by selecting the Work Offline button and choosing the Upload link.
- Choose the Browse my computer button to find and select the amended grades file on your computer and select Auto for the Delimiter Type.
- Select the Submit button.