Creating Grade Schemas
- Gerard Ross
Introduction
A Grading Schema is a diagram based on percentage ranges that matches scores to specific grade displays. For example, a student’s raw numeric score on a quiz that has 100 possible points is an 88. In a Grading Schema in which a percentage of 87.5 to 89.5 equals a B+, this score results in a B+. If the grade display Letter option is chosen, the B+ will display to the Student. Grading Schemas may be edited or added to an ongoing Course and grades will be updated to reflect the changes.
A copy of the system default grading schema is included in all Course sections. Instructors can modify the pre-defined grading schema and save changes within their Course sections. Instructors also have the ability to create additional Grading Schemas within in their Course sections to reflect the multiple ways in which they may need to grade throughout their Courses.
Table of contents
Creating Grading Schemas
Note:
The dash symbol "—" cannot be used as an entry. The dash represents a Null value.
The percentage range given for each grade value must begin with the lesser value listed first. The values must also overlap. For example A = 90 – 100%, B = 80 – 90%, C = 70 – 80% and so on. Ranges must be set up in this way to avoid gaps that could occur when a score falls in between numbers in the range. The range of 80 – 90% includes all grades up to but not including 90%. The top range does include 100%.
- Login to Blackboard.
- Make sure your Edit mode is ON.
- Select the Programme you will be working in from the Course List.
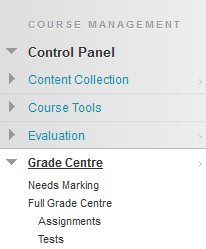
- Select the Grade Centre button - highlighted in the image below - from the Control Panel menu to go to the Grade Centre.
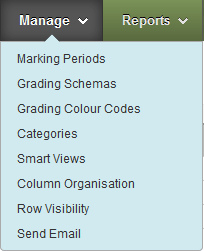
- On the Grade Centre Action Bar, choose the Manage button and from the drop-down menu select Grading Schema.
- The Grading Schema page will open. Select the Create Grading Schema button.
- The Create Grading Schema page will open:
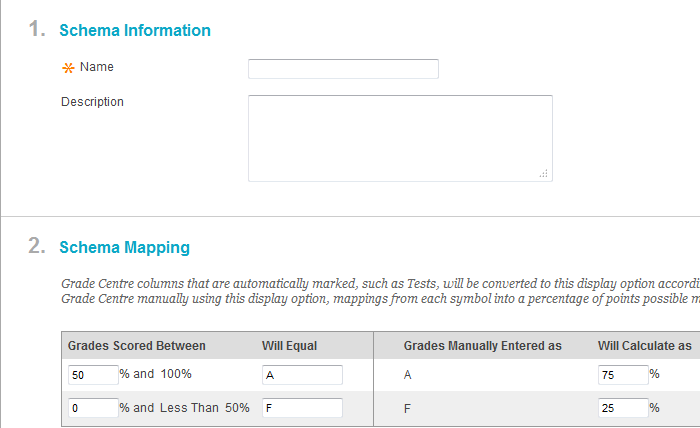
- Enter an appropriate schema Name and Description.
Enter the Schema Mapping information. By default, any new grading schema will have two ranges of percentiles from 50% to 100% and from 0% (zero) to less than 50%. For example, a pass/fail schema might be set up like this:
Grades scored between
Will equal
Grades manually entered as
will calculate as
50% and 100%
Pass
Pass
100%
0% and less than 50.0%
Fail
Fail
0%
Although a typical a schema might be: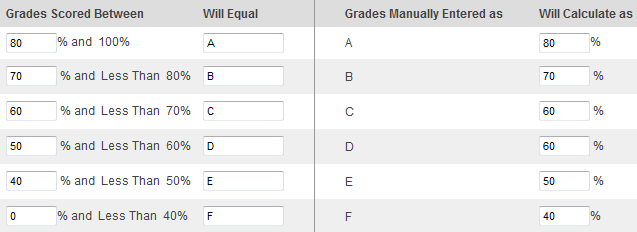
- Select the Insert Row arrow to insert a new row into the schema to enter additional display values to the schema.
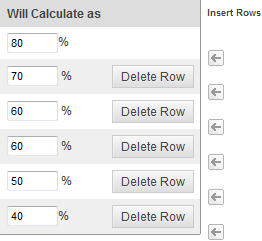
- Select the Submit button to save your Schema.
Example of Grading Schema
Example of Column Chapter 2 displaying stardard percentage grade: 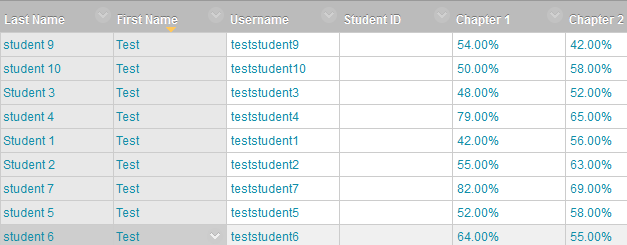
Example of Column Chaper 2 displaying schema *COM101 Grading Schema" 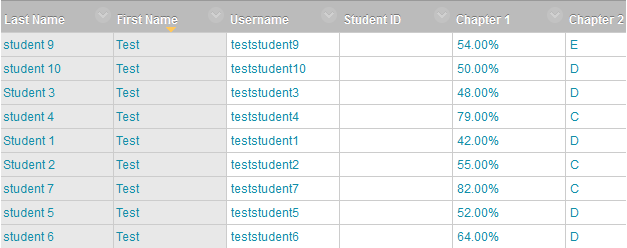
Applying Grading Schema to a Grade Column
- Login to Blackboard.
- Select the Programme you will be working in from the Course List.
- Select the Grade Centre button from the Control Panel menu to go to the Grade Centre.
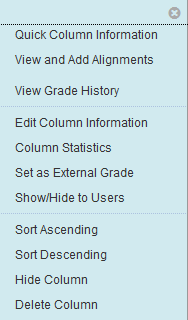
- From the contextual menu next to the title of a column select Edit Column Information. The Edit page will open.
- In the Column Information section, select the Primary Display drop-down menu.
- Select the Grading Schema you have created earlier. In this example below the Grading Schema is called 'COM101 Grading Schema'
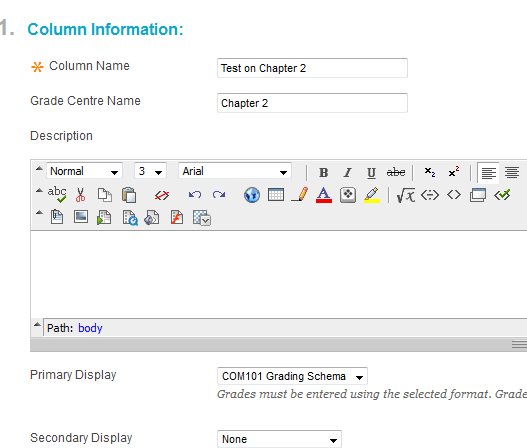
- Select the Submit button to apply your Grading Schema.