Share Content - Files, Application/Screen, Whiteboard, Breakout Rooms and Polls
- Gerard Ross
Introduction
Share Content allows a Moderator to upload content for display at any point during the session. The Content Editing tool allows for annotation of shared files during a session.
Tip: Moderators can open a session at any time prior to its release and pre-load the files they want to share. These files stay in the session until deleted by a moderator and can be reused.
Table of contents
Supported Files
Moderators and Presenters can upload GIF, JPEG and PNG images, PDF files, or PowerPoint presentations of 60MB or lower to a session. Moderators can also upload multiple presentations, however the total size allowed is 125 MB or lower for any particular session.
As part of the upload process, Blackboard Collaborate Ultra will convert PowerPoint slides into static images. Animations and transitions will be lost during this process.
Tip: The upload and conversion process can take some time to complete. For this reason, we recommend uploading large files in advance of the actual session.
Tip: We typically see issues with users attempting to upload large PowerPoint files (over 60MB). Using large, un-optimised images in slides can make a PowerPoint larger than it needs to be. Consider compressing the images in your slides to reduce file size. To do this:
- Select any image in the PowerPoint file you’re going to upload.
- Select Picture Format from the menu in PowerPoint.
- Select the Compress Pictures button.
- Select the Picture Quality from the dropdown menu that appears e.g. Print 220 ppi.
- Ensure Delete cropped areas of pictures is selected.
- Choose to perform this action on the selected image(s) or all of them.
- Select
(Alternatively, convert the PowerPoint file to a PDF. This is usually enough to reduce the file size so that the document can be uploaded to Blackboard Collaborate Ultra).
How to Share a File
Uploading a file for sharing
To upload a file to Blackboard Collaborate Ultra for sharing:
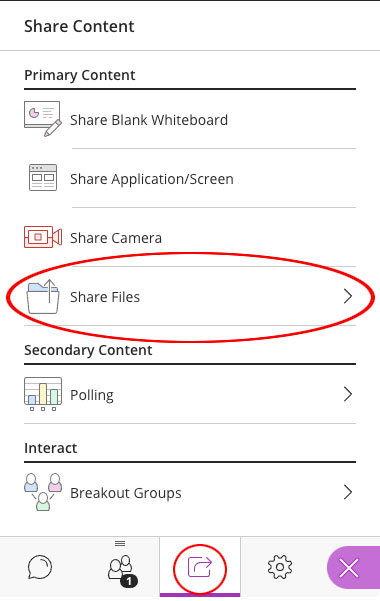
- Select the Collaborate Panel button.
- Select the Share Content icon at the bottom of the panel.

- Select Share Files link under Primary Content.
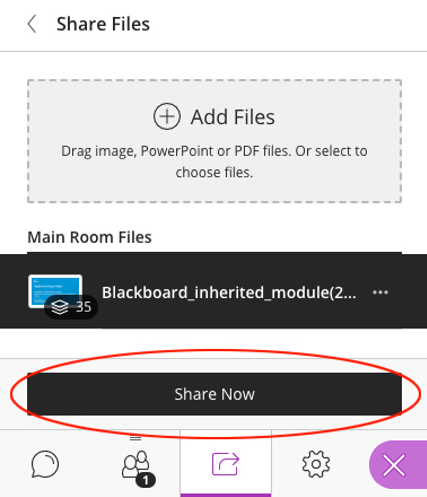
- Upload files by dragging-and-dropping them (in supported browsers) onto the Add Files Here box.
Alternatively, select the Add File Here button to open a file dialogue box and select the file(s) you want to upload.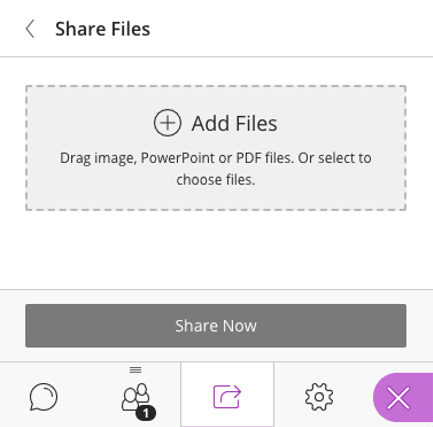
- Blackboard Collaborate Ultra will begin converting the file.
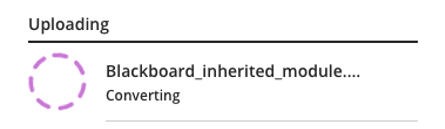
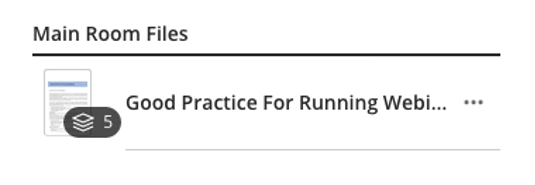
- When Blackboard Collaborate Ultra finishes converting the file it will become available for sharing in the Share Files list.
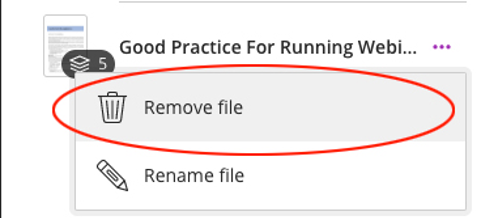
- To delete a file from the Share Files list, select the ellipsis icon to the right of the file name and choose Remove File from the drop-down menu that appears.
Share an uploaded file
To share the file(s) you’ve uploaded the Share Files list:
- Choose one of the available files by selecting the title.
- Select the Share Now button at the bottom of the panel.
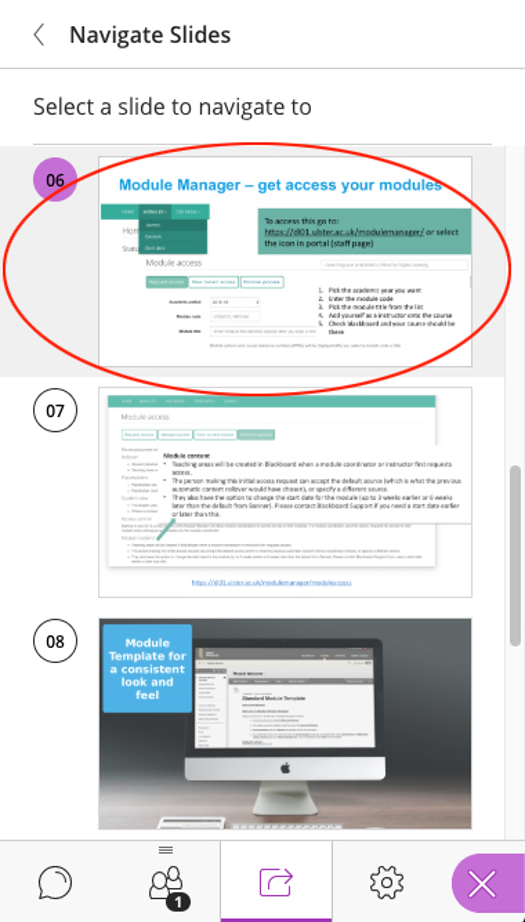
- Select the slide or page you wish to display from the Navigate Slides panel to begin the share. The selected slide will appear in the Media Space and be displayed to all Participants.

Once a file is being shared, moderators and session presenters can see what file is currently being shared and move between uploaded files without stopping the file share.
Navigating Shared Files
Navigation tools will display below shared files that include multiple pages, such as PowerPoint slide decks, or PDF files, allowing the Moderator or Presenter to navigate forward and backward through the various pages of the file.
To navigate to a particular slide or page:
- In the Navigate Slides panel, select the slide or page you wish to display.
- Or, use the arrow buttons - below the current slide in the Media Space - to navigate through the pages.

Content Editing Tools
If the Draw on whiteboard and files permission is enabled in the Session Settings, participants may employ the Content Editing tools to annotate the shared file.
As a Moderator, you can use all the available Content Editing tools even if the permission has been disabled for Participants.
Once sharing begins, users can also use the Show/Hide View Controls toggle to display resizing tools.
Note: The Media Space view is unique to each user, so zooming in on your view does not zoom the view for participants.
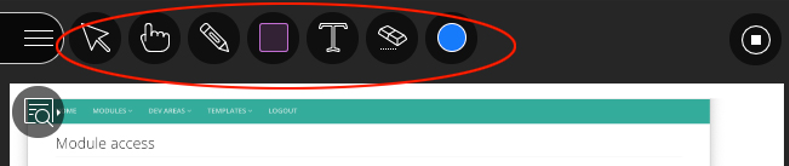
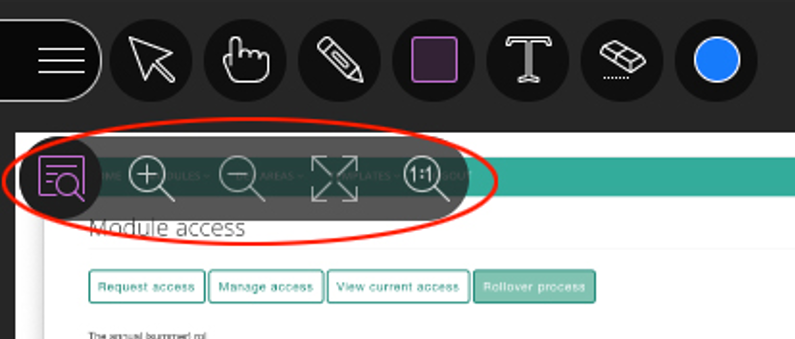
Taking each of the View Controls from left to right:
- Show/Hide View Controls: This button will show and hide the View Controls menu.

- Zoom In: Zoom In allows users to make the content bigger. When the current view is larger than the available space, users can click and drag to move the content around and see everything.

- Zoom Out: Zoom out can be used to make the content smaller, allowing users to see more of the content.

- Best Fit: Best Fit adjusts the content to be completely viewable in the available Media Space area. It displays as large as possible while keeping the aspect ratio intact.

Stop Sharing a File
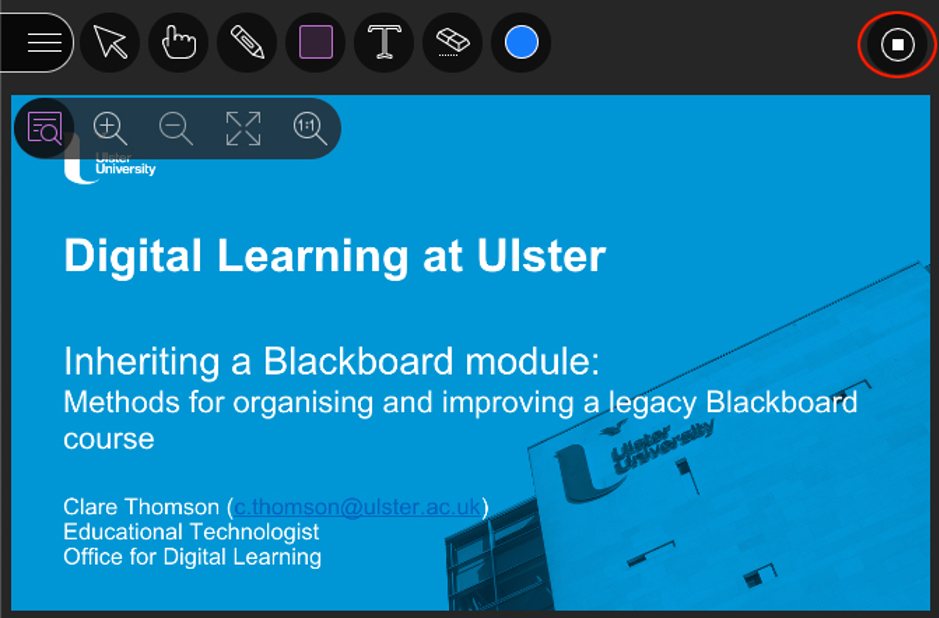
To Stop Sharing a File:
- Select the Stop Sharing button at the top-right of the Media Space (highlighted in red below).
How to Share the Whiteboard
The Whiteboard is used for collaboration between session participants, who can interact with the content using the whiteboard tools. Use the Whiteboard to create interactive activities to engage participants, conduct brainstorming activities and save the Whiteboard to share it with all participants after the session.
To begin sharing the Whiteboard with the Participants:
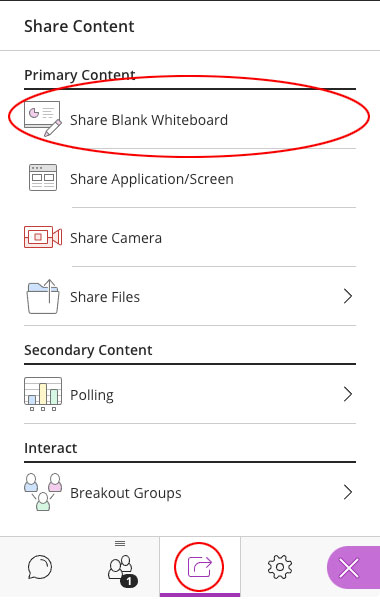
- Select the Collaborate Panel button.
- Select the Share Content icon at the bottom of the panel that appears.

- Select the Share Blank Whiteboard button under Primary Content.
- Participants can then use the View Controls and Content Editing Tools to view and interact with the Whiteboard.
- To stop using the Whiteboard select the Stop Sharing button at the top-right of the Media Space (highlighted in red below).
Saving the Whiteboard for later use
To save a Whiteboard for use after the session:
- Right-click anywhere on the Whiteboard and select Save Image As… from the drop-down menu that appears.
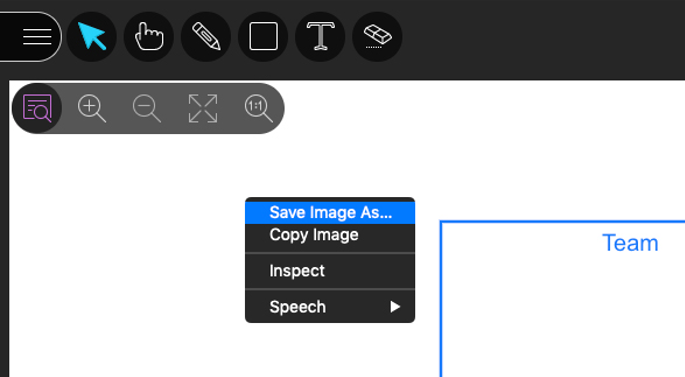
- Save the image file to your computer.
How to Share Application/Screen
Application Sharing allows Moderators and Participants (who have been granted sharing permissions) to share their screen or software application during a session.
For example:
- Share a student’s assignment and make changes in real time
- Provide technical support
- Demonstrate a coding assignment
Note: Application sharing should work with any modern browser that supports Web Real-Time Communication (WebRTC). See our Browser Requirements section for more information on supported browsers.
Using Application Sharing
Any session attendee with the Moderator or Presenter roles can Application Share.
Note: A session Moderator can promote any Participant to the role of Presenter or Moderator for the purposes of sharing their application/screen. We recommend that Participants are promoted to Presenter only, as Moderator access gives anyone with this role the ability to end the current session.
Tip: In advance of an Application Sharing session, you’ll need to open all the applications/files you want to share. Make sure your computer/device is capable of running multiple applications at once without significant slowdown. Application sharing is the most processor intensive feature in Blackboard Collaborate Ultra.
Tip: For the best results when application sharing, we recommend a strong, stable broadband internet connection. Preferably a wired ethernet connection.
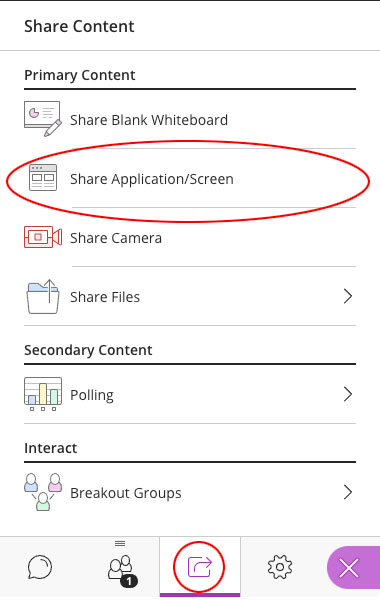
Share an Application/Screen
To start a share:
- Select the Collaborate Panel button.
- Select the Share Content icon at the bottom of the panel that appears.
- Select the Share Application/Screen button under Primary Content.
- On the Share your screen pop-up window that opens, you have the option to share:
- Your Entire Screen
- An Application Window (you will be shown a thumbnail for each open application)
- A single Browser tab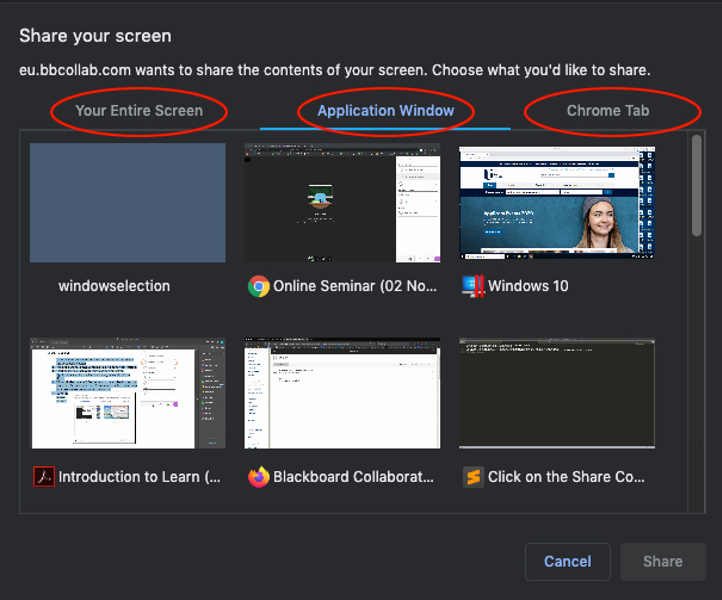
- Select your preferred sharing option.
Select the Share button.
Note: When Moderators and Presenters share a video using the Google Chrome browser, Participants will be able to hear the audio - if the Share Audio checkbox is selected.
As you navigate through the application, participants will see your mouse move and the changes as they are being made to the displayed content. The service is fully secure, and you are always in control of what is shared and when. While running an Application Share, a Moderator/Presenter can continue to use the program or desktop as usual.
Tip: Close all unnecessary applications before the session begins. To prevent interruptions from pop-up messages, close Outlook (web mail and client) and Skype for Business.
Once sharing begins, users can use the Show/Hide View Controls toggle to display resizing tools.
Tip: The Media Space view is user specific, so zooming in on your view does not zoom in the Participant view.
Stop Application/Screen Sharing
To stop application/screen sharing:
- Select the Stop Sharing button at the top-right of the Media Space (highlighted in red below).
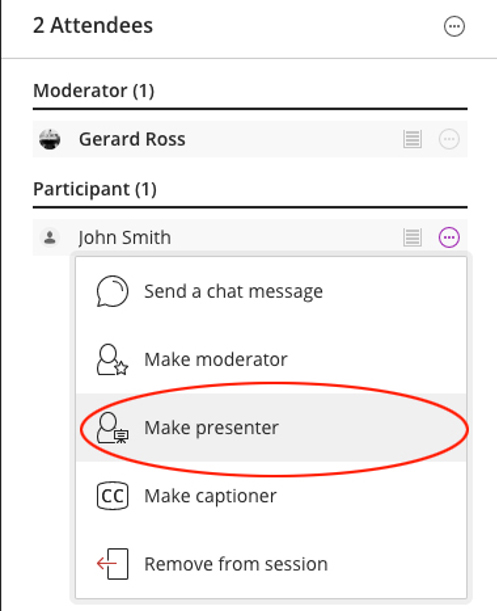
Giving Participants Application Sharing Permissions (Promoting a Participant)
By default, Participants do not have permission to use Application Sharing. In order to give them Application Sharing permissions, the Moderator may promote any Participant to either the Moderator or Presenter role, via the Attendee Controls menu.
To do this:
- Select the Collaborate Panel button.
- Select the Attendees icon (highlight in red below) at the bottom of the panel to see a list of all participants.

Select the ellipsis icon to the right of the Participant’s name and select Make Presenter or Make Moderator to promote the Participant.
Tip: If possible, identify those Participants you will be promoting to Presenter/Moderator before the ‘live’ session and test how well they can Application Share in a separate ‘Test’ Blackboard Collaborate Session. This will help identify any potential issues and give you time to resolve them.
The new Share Camera option in Blackboard Collaborate Ultra gives the Moderator/Presenter the ability to share more than one camera with participants.
Table of contents
For example, you can share your webcam video and share another camera connected to your computer showing an experiment, or the feed from a visualiser. Attendees can see you and anything else you want to show.
Note: The number of cameras and USB ports you have - and that your computer can power and support – are the only limit to the number of cameras you can share.
To Share a Camera
To start a share:
- Select the Collaborate Panel button.
- Select the Share Content icon at the bottom of the panel that appears.
- Select the Share Camera button under Primary Content.
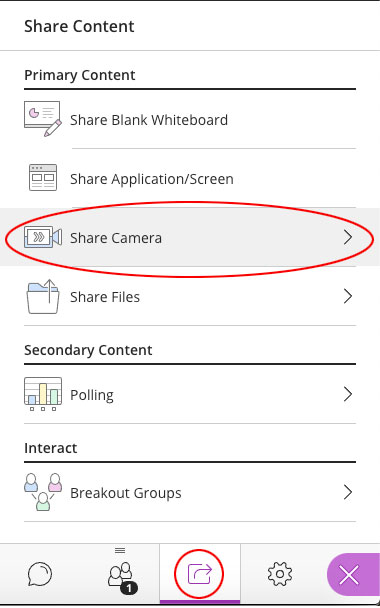
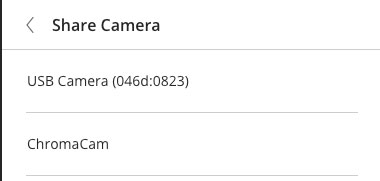
- On the Share camera panel that opens, you will see a list of the cameras that are currently connected to your computer. Select the one you want to share.
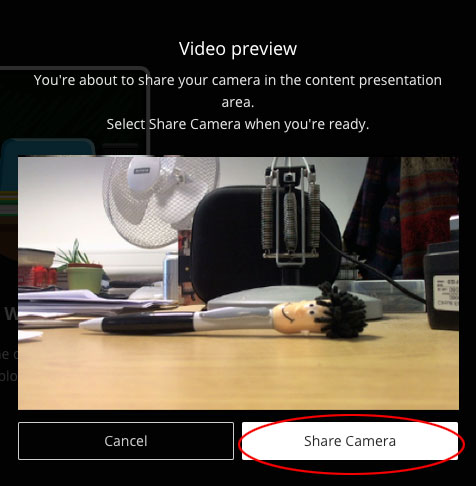
- A pop-up Video Preview will appear. Select the Share Camera button to share that camera with the Participants:
- Repeat this process for each camera you want to share.
How to Share a Poll
One way to add interactivity to a session, gauge student understanding and get live feedback, is by using the Polling feature in Blackboard Collaborate Ultra.
Tip: Remember to create your poll before the session begins!
Create a Poll
To add a poll to your Blackboard Collaborate Ultra session:
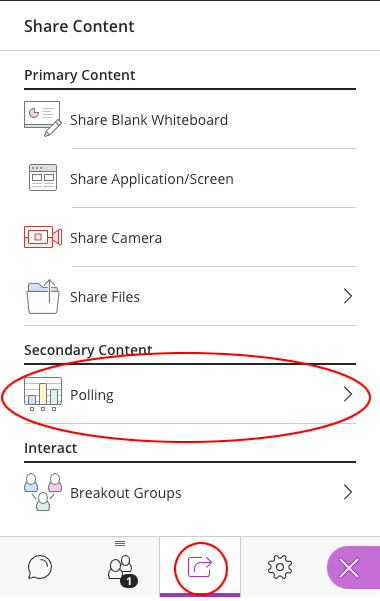
- Select the Collaborate Panel button.
- Select the Share Content icon at the bottom of the panel that appears.
- Select the Polling button under Secondary Content
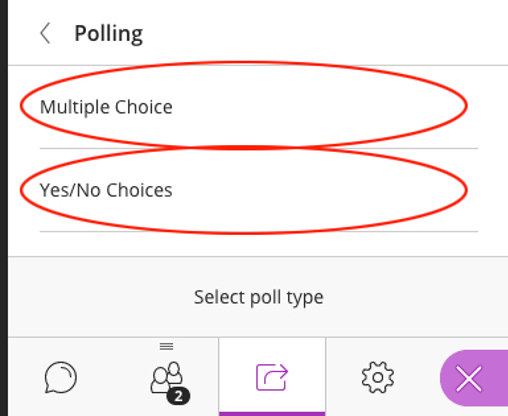
- On the Polling dialogue box that opens, you have the choice of either Multiple Choice or Yes/No Choices question types.
- Enter the question and answer choices for the question type you have chosen. For example, a multiple-choice question:
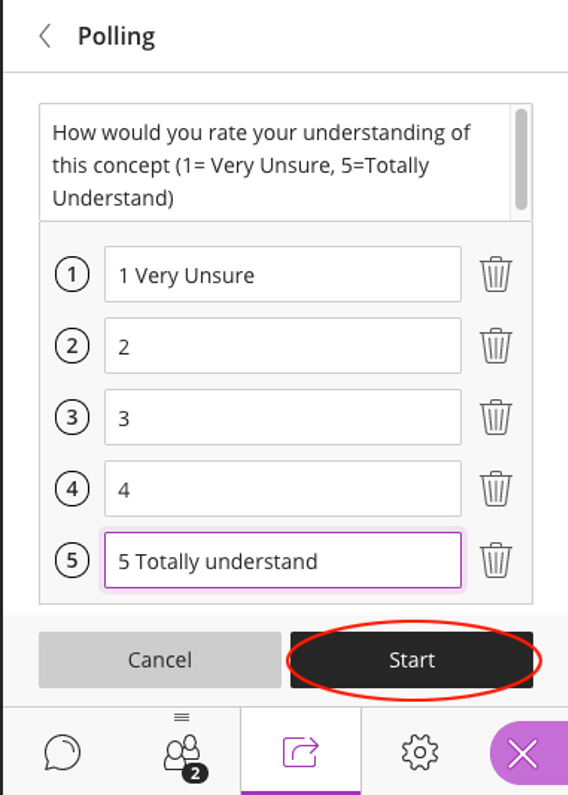
- Then select the Start button.
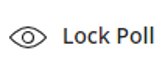
- To pause Participants’ ability to respond e.g. to give them time to consider their response, select the Lock Poll button.
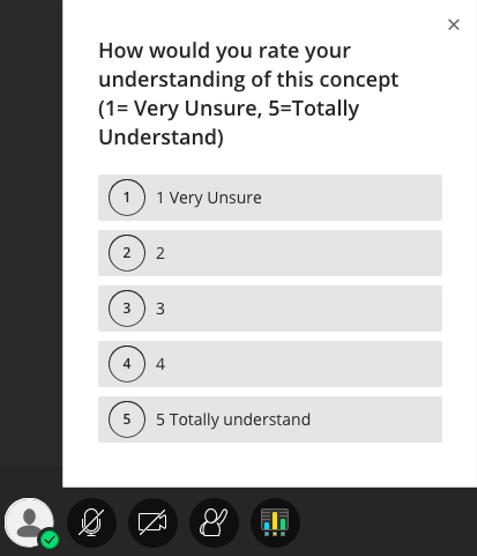
- The poll will be released to participants and will appear at the bottom of the Media Space.
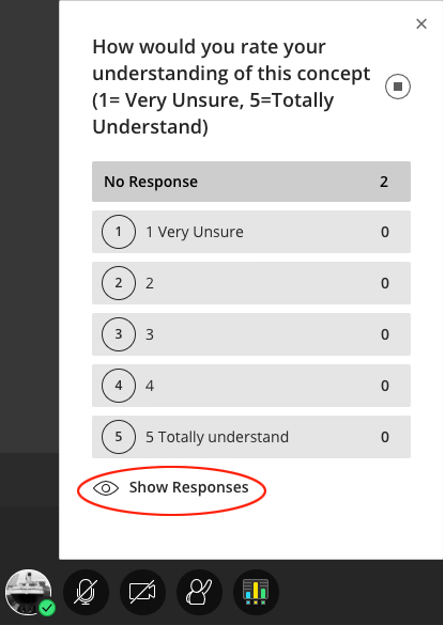
Close a poll and show responses
To close the poll and show participant responses:
- Select the End Polling option at the top right of the poll (highlighted in red below).

- To show the responses to the Participant’s, select the Show Responses button at the bottom of the poll.
How to Create Breakout groups
To facilitate small group collaboration, you can create Breakout Groups that are separate from the main room and assign participants to them.
To create a Breakout Group in your Blackboard Collaborate Ultra session:
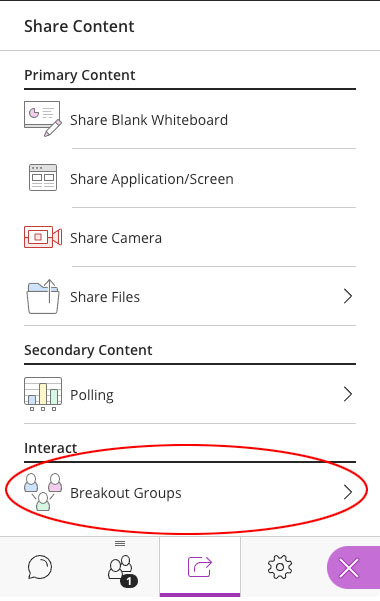
- Select the Collaborate Panel button.
- Select the Share Content icon at the bottom of the panel that appears.
- Select the Breakout Groups button under Interact.
Assigning Participants to Breakout Groups
To manually assign participants to groups:
- Select the Allow participants to switch groups option if you wish to permit students to change their enrolled group.
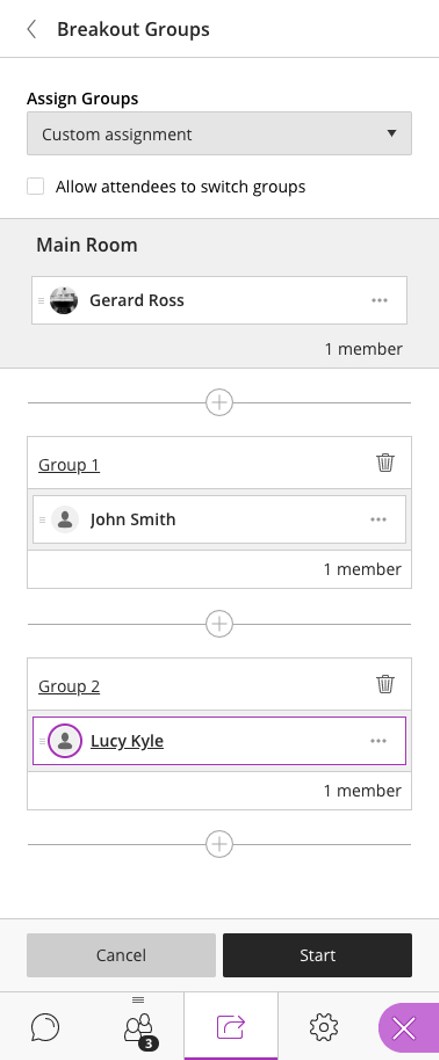
- Main Room: Participants in the main room will be listed here. Select Show All to see a list of all participants.
- Groups: Drag participants from the main room to the desired group. Select the group name to rename the group.
- Add group: Select the + sign to add additional groups.
- Delete group: Select the trash can icon to delete the group.
- When finished, select the Start button to start the breakout rooms.