...
Basic and Advanced Adaptive Release methods compared
Type | Number of | Number of Criteria or | Advantages | Example |
|---|---|---|---|---|
Basic | One | Up to four, but only | You can set all four types | An online Test on a specific |
Advanced | Unlimited | Unlimited | You can add multiple | You can make lecture notes |
Best practice
Adaptive Release is best used to limit access to a subset of students (group assignments for example), to time release content, or to re-release course links to quizzes or assignments after due dates have past.
...
- Login to Blackboard.
- Make sure your Edit mode is ON.
- Select Adaptive Release from the contextual menu (double chevron) on the item you want to put a Release by Date.
- The Adaptive Release form will appear
- Go to section 1. Date of the Adaptive Release form.
- Insert the date for Display After and Display Until, please note you can also select time as well.

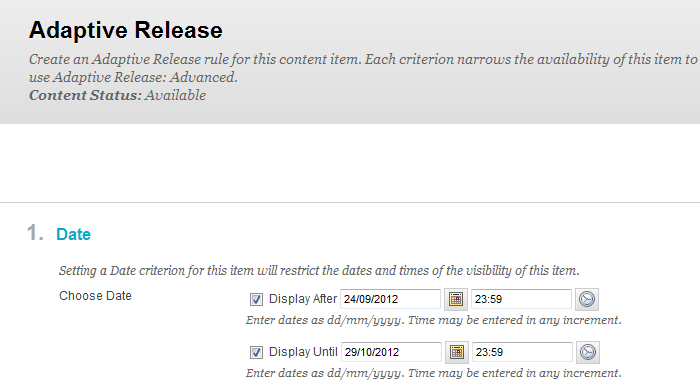
- Select Submit to apply.
Adaptive Release by Membership
...
- Login to Blackboard.
- Make sure your Edit mode is ON.
- Select Adaptive Release from the contextual menu (double chevron) on the item you want to put Release by Membership.
- The Adaptive Release form will appear.
- Go to section 2. Memberships.
- Enter one or more Username values separated by commas, or alternatively use the Browse button to select members by Firstname or Surname.
- If you already have groups set up, you can use the arrows to move them across from Items to Select to Selected Items.

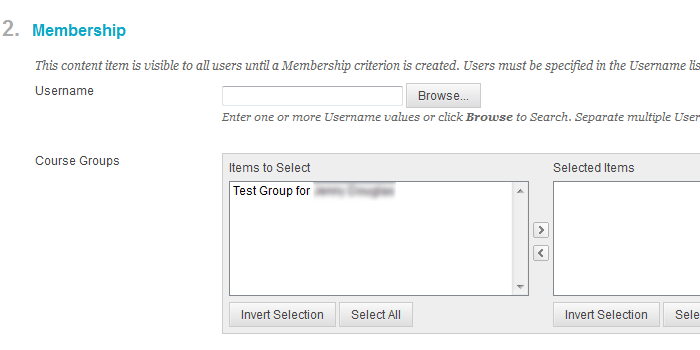
- Select Submit to apply.
Adaptive Release by Grade
...
- Login to Blackboard.
- Make sure your Edit mode is ON.
- Select Adaptive Release from the contextual menu (double chevron) on the item you want to put a Release by Grade.
- The Adaptive Release form will appear.
- Go to section 3. Grade.
- Select a Grade Center column if applicable (remember items set to be graded automatically generate a column in the Grade Center).
- Select a condition, only one condition can be selected either User has at least one attempt for this item OR via grade selections (Less than or equal to / Greater than or equal to / Equal to OR a grade range).

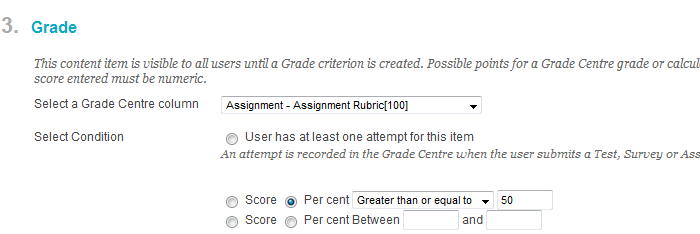
- Select Submit to apply.
Adaptive Release by Review Status
- Login to Blackboard.
- Make sure your Edit mode is ON.
- Select Adaptive Release from the contextual menu (double chevron) on the item you want to put on a Review Status.
- The Adaptive Release form will appear.
- Go to section 4. Review Status.
- Select Browse to search for your item. The Select Content window will open.
- Select the item by clicking on it.


- Select Submit to apply.
Adaptive Release: Advanced
...
- Login to Blackboard.
- Make sure your Edit mode is ON.
- Select Adaptive Release:Advanced from the contextual menu (double chevron) on the item you want to put on a Review Status.
- The Adaptive Release:Advanced form will appear.
- Select Create Rule to search for your item.
- Input an appropriate Rule Name.
- Select Submit to execute.
- Select Create Criteria from the contextual menu (double chevron).
- Select and complete Date, Grade and Membership as required.

- Select Submit to apply.
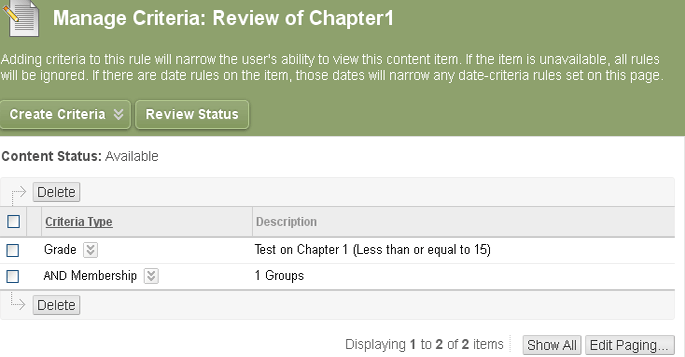
When multiple criteria are added to a rule, the criteria are listed in the Criteria Type column. Two requirments have been added in the example below. The word AND appears between each criterion, meaning all of the rule's criteria must be met before the item is released.
...