...
The content frame occupies most of the screen and displays the current view. The size of the content frame can be increased or decreased by clicking and dragging the border that separates the two panels. The content frame includes the Breadcrumb Trail, Action Bar, and Content Frame. The main content frame displays the area of the content collection you are working in, for example: viewing Content Collection folders or items. When displaying the contents of the folder, users can sort the folders and items by clicking the column titles.


Content Areas
The Content Collection organizes files and folders into separate areas for users, Courses, and the Institution itself. Each area is accessed through the Content Collection menu. Selecting an area displays the hierarchy of folders and files available to the user in that area. There are three default content areas: My Content, Course Content, and Institution Content.


Personal Settings
The Tools > Personal Settings page allows you to select an entry point into the Content Collection that best meets your needs. If you access the same Course in the Content Collection every time you open the tab, set the Home Page to point to that Course folder in the Content Collection for quick access.


Go to Location
The Tools > Go to Location page allows users to go directly to a specific folder in the Content Collection. This timesaver allows you to enter the path to open a folder and Bookmark the location at the same time.
Content Collection Menu
The Content Collection menu can be viewed two different ways. These views are represented by icons at the top of the panel – highlighted in red in the image below. The shortcut view appears initially by default.
The shortcut view includes buttons to open each content area and bookmarks.


The folder view shows each content area with a nested folder structure with the ability to expand or close each folder to view the subfolders.


The system will save and return you to your view preferemce each time you enter the Content Collection. You may drag the right-side of the frame to adjust the size of Content Collection menu.
...
The Jump To menu provides access to Portfolios, Collaboration tools and other Content Collection tools. Each sub menu is collapsible so that you can hide/show only what you need to see. Clicking a Jump To menu item will open the tool in the content frame of your application.


Search Content Menu
...
Type of Search | Description |
|---|---|
Basic Search | Within the Basic Search you can search terms within metadata and file or folder names. |
Advanced Search | The Advanced Search contains more options to search on username, dates, file size and more specific metadata. |
Portfolio Search | The Portfolio Search is used to search only portfolios created in Blackboard Learn. Your search will only return portfolios that have been set to available or have been shared with you. |
Saved Searches | Saved Searches include any search that you have saved after it has been run. For example, you searched for a biology article that your instructor made available and you want to be able to find it again. Once you complete the search you can click Save Search in the Action Bar and name the search so that you can easily find the article again. |


Breadcrumb Trail
The Breadcrumb trail appears at the top of the Content Frame. It is a hierarchical trail that shows where in the Content Collection the user is located and how they got there. Select each item in the trail to proceed to that folder. Breadcrumb drop-down buttons act as hierarchy folder separators. Click the Breadcrumb drop-down button to view a list of options for that folder.

![]()
Action Bar
The Action Bar appears below the Breadcrumb Trail. It includes buttons to perform actions specific to that page. Different options will be available based on your system settings or privileges.


Folders and Items explained
...
The following options are available from the contextual menu next to any Item or Folder in the Content Collection:


Contextual Menu items explained
...
- After logging into Blackboard Learn, select the Content Collection tab at the top of the Blackboard Learn application window. Alternatively, the Content Collection is also available from the Control Panel.
- Navigate to the content area or folder that will contain the new folder.
- On the action bar, select the Create Folder button. If the Create Folder button does not appear, you do not have permission to add a folder in the current location.


- Type a name for the Folder in the Folder Name field that opens below the Action Bar. In the example below the Folder name is “Practicals”.


- Select Submit to complete the action or Create and Customize to set Options for the folder.
- If you selected Create and Customize, the Edit Folder page will open. Select any of the available Options to customize your Folder and click Submit.
...
- After logging into Blackboard Learn, select the Content Collection tab at the top of the Blackboard Learn application window. Alternatively, the Content Collection is also available from the Control Panel.
- On the Action Bar, point to Upload and from the drop down menu select Upload Files. The file upload window will open.

- If you are uploading multiple files, use the Multiple Files and Folders option available from the top right of the page. Use the Single File option to upload one file at a time.

- You can Browse for files or – in Multiple Files mode - drag and drop several files from folders on your desktop to the upload queue.


- After adding files to the list, select Submit to upload the files.
...
- Navigate to the folder in the Content Collection where the items are located.
- Highlight the checkboxes next to the file/folder you want to download.
Select the Download Package button.


Note Note:
A single .XML file is sometimes downloaded with the files and folders called metadata.xml. This .XML file contains the metadata for all of the items downloaded.
...
- Login to Blackboard.
- Select the learning program you want to use content from.
- Turn Edit mode ON.
- Select a content area from the Course Menu.
- Point to the Build Content button.

- From the drop down menu select File. The Create File window will open.
- Select the Browse Content Collection button. The Select File or Folder window will open.
- Navigate to where you uploaded your item.
- Select the item by highlighting the radio button next to the file name.
- Select Submit to execute.
| Note |
|---|
Note: |
...
- Login to Blackboard.
- Select the learning program you are going to be working in.
- Turn Edit mode ON.
- Select the content area from the Course Menu.
- Navigate to the folder that contains the item or folder you want to create a pass for.
- Select Passes from the contextual menu for the item. The Create Pass window will open.
- Click Create Pass in the Action Bar.
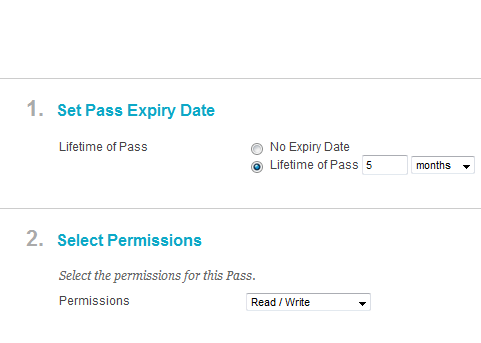
- Enter information in the following fields and select Submit.
- Set Pass Expiry Date. This is the length of time the Pass will exist for. This can be set to minutes, hours, days, weeks, months or even years. By default Passes are set with No Expiry Date.
- Select Permissions for this Pass. The Pass can be set to allow users to have Read, Read/Write or Read/Write/Delete access to the item. Care must be taken when setting Read/Write or Read/Write/Delete access as the item can be altered or deleted.

| Note |
|---|
Note: |
...
- Navigate to the folder that contains the item or folder.
- Select Passes from the contextual menu for the item.
- Select a pass by clicking the check box next to it.
- Click Email Pass on the Action Bar.


- Enter the required information on the Email Passes page.
- Select Submit.
...
- After logging into Blackboard Learn, select the Content Collection tab at the top of the Blackboard Learn application window. Alternatively, the Content Collection is also available from the Control Panel.
- Navigate to the content item in the Content Collection.
- Select 360° View from the contextual menu beside on any item in the Content Collection.


- The 360° Viewwindow will open, which contains categorized information on the item:
- About this File
- Properties.
- Comments.
- Versions.
- Learning Objects Catalogue Entries.
- File Activity
- Permissions.
- Passes.
- Links (where you have shared items).
- Tracking Data.
- Metadata
- Tracking.
- About this File
...